Building A Sailboat Rudder Jacket,Free Iom Model Yacht Plans 10,Fishing Boats On The Beach 89 - PDF Review
17.05.2021, adminEven stoutly constructed rudders are vulnerable to deterioration over time, especially when mild steel or high-carbon-stainless steel is buried in composite foil sections, which inevitably become saturated with seawater.
Like other systems and gear aboard cruising and commercial vessels, building a sailboat rudder jacket have terms to identify their parts and functions. When measuring a rudder, the span and chord are the vertical height and fore-and-aft width, respectively, while the top of portion closest to the hull is referred to as the rootand the bottom is called the tip.
As a rule of thumb, longer, narrower rudders are more efficient than short, wide rudders, and the aspect ratio describes precisely this relationship. Thus, rudders on high-performance sailing vessels are said to have a high-aspect ratio. Walking around a boatyard one day and measuring a few cruising sailboat rudders, I came up with aspect ratios of between 1. More identifiable rudder components include the stock ; web or armature ; rudderport or log ; stuffing box or compression tube ; bearing ; gudgeon ; and pintle.
Not every rudder has all these components. The rudderstock is essentially a shaft or tube that protrudes from the top and sometimes the bottom, depending upon type, of many rudder designs. Most stocks are made of stainless steel, bronze, or aluminum, while some are carbon fiber, and they may be solid or hollow.
Stainless steel is by far the most common, but it has a penchant for crevice corrosion when exposed to oxygen-depleted water. Insidiously, corrosion nearly always occurs in places where it cannot easily be seen�such as inside many composite fiberglass and core material rudder blades and beneath flax-type stuffing-box packing the problem is exacerbated when the vessel is used infrequently.
This all-stainless rudderstock and webbing is well crafted and ready to be covered with its composite shell. Of the stainless steel alloys, some resist this corrosion better than.
Stainless-steel rudderstocks should be manufactured with strong, highly corrosion-resistant proprietary shafting alloys such as A The next best choice is L stainless steel, which also resists crevice corrosion. Failure to source low-carbon stainless steel for the stock or the web leads to weld decay, sometimes referred to as carbide precipitation, where the region around the weld loses its resistance to corrosion and rusts when exposed to water.
Aluminum rudderstocks are nearly always tubular. Common on aluminum vessels to reduce the likelihood of building a sailboat rudder jacket corrosion, aluminum stocks are also relatively common on fiber reinforced plastic FRP vessels, particularly large ones. Rudder blades, particularly on aluminum vessels, are often fabricated from aluminum.
Of the various aluminum alloys, only a few possess the necessary corrosion-resistance and strength necessary for use as rudderstocks. Of these, the series, and in particular�an alloy of building a sailboat rudder jacket, manganese, and silicon�are popular for this application. Because aluminum, like stainless steel, suffers from corrosion, it should building a sailboat rudder jacket be used as stock or web material in composite rudders.
Referred to as poultice corrosion, it occurs when aluminum is exposed to oxygen-depleted water. Because oxygen is what allows aluminum to form its tough, corrosion-resistant oxide coating, the metal should never be allowed to remain wet and starved of air as it would be inside a building a sailboat rudder jacket rudder blade after water makes its way in around the stock and pintle.
Rudderstock material can corrode in way of the oxygen-starved building a sailboat rudder jacket around the packing in a stuffing box. Bronze rudderstocks, particularly those that have seen many sea miles, are also known for wearing, or hourglassing, within stuffing boxes, where the flax rides against the stock.
If a bronze stock rudder is chronically leaky, disassemble the stuffing box and check for excessive wear. The same is true for stainless and aluminum stocks: chronic leakage is often an indication of corrosion at the packing.
Finally, because of their galvanic incompatibility, neither bronze nor copper alloys should be used aboard aluminum vessels for rudderstocks or any other rudder or building a sailboat rudder jacket box components. Mild-steel webbing welded to a stainless-steel rudderstock is a recipe for eventual corrosion and failure. The webbing, or internal metallic support system, in most composite rudders must be strong enough to carry the loads of service and be made of the building a sailboat rudder jacket material.
At one time, many rudders were built using stainless-steel stocks and ordinary, rust-prone mild or carbon-steel webbing. Inadvisably, some still are. Once water enters the gap between building a sailboat rudder jacket two building a sailboat rudder jacket, it will reach the webbing and associated welds.
Thus, all the materials within this structure must be as corrosion- and water-resistant as possible, and the core material must be closed-cell�often foam�and nonhygroscopic. This destroyed foam-core and stainless-steel rudder reveals the conventional construction of such appendages. Additionally, where possible, the stock should consist of a single section of solid or tubular material; i. The webbing must be welded to the stock, but the structure of the stock should not rely on a weld that would experience cyclical, torsional loading.
Whether the rudder is spade supported only at the top or skeg hung supported at the top and the bottomthe stock must pass through and be supported by the hull. This is usually accomplished by a component known as a rudder log, or port.
Nearly all logs incorporate two other components�a bearing and a stuffing box. The bearing may be as building a sailboat rudder jacket as a bronze or nonmetallic bushing or tube inside of which the stock turns; or it may be as complex as a self-aligning roller-bearing carrier that absorbs rudder deflection and prevents binding.
This rudder log is leaking, corroded, and poorly supported, with washers compressing into the backing plate and gelcoat cracking off. The log transfers tremendous loads and must be exceptionally strong and well bonded to the hull. On metal boats the design is similar but with a metal tube welded in place, supported by substantial gussets.
For vessels with skeg-hung rudders, the strength of the rudder log is still important. However, because the loads are not imparted by a cantilevered structure, logs used in these applications may be less substantially building a sailboat rudder jacket. Because the rudder turns slowly, friction and heat are not a problem. Packing i. Stuffing boxes that are above the waterline while the vessel is at rest, such as those on many sailboats, are often the most chronically leaky, because the packing tends to dry out and contract.
To avoid this, liberally apply grease to the packing material itself; this requires partial disassembly of the stuffing box. Alternatively, a galvanically compatible stainless or Monel for bronze stuffing boxes grease fitting may be installed and periodically pumped with grease to keep the packing lubricated.
Rudder bearings range from the basic rudderstock turning inside a bronze log, to the sophisticated aluminum, stainless, or nonmetallic roller bearings installed in a self-aligning carrier. For most cruising vessels, the choice of bearing is not as important as knowing which type of bearing is in use and its strengths, weaknesses, and maintenance needs.
The simple shaft that turns inside a bronze log is durable and reliable but more friction-prone than roller bearings. If lubrication access or a grease fitting is available, it should be pumped with grease periodically, although most rudders rely solely on seawater for lubrication, which is perfectly acceptable. This synthetic upper bearing worked fine in cool temperatures, but when it heated up in the building a sailboat rudder jacket, the material expanded and caused binding in.
Building a Building A Sailboat Rudder Vision sailboat rudder jacket sleeve and roller bearings, often made of ultra high molecular weight polyethylene UHMWPErequire no maintenance, are extremely slippery, and will not absorb water, an essential attribute for nonmetallic bearings.
Delrin and nylon, for instance, will absorb water, expand, and lead to rudder binding. Shaft Building A Sailboat Rudder University removal should be possible with the rudder in place. This conventional skeg-hung rudder has a hole to facilitate shaft removal when the building a sailboat rudder jacket is swung hard to port or starboard. Can the shaft be slid out without removing the rudder?
The propeller should be removable without having to unship the rudder. Just as important as the rudder travel is how its movement is checked. Other than for the smallest runabouts with jacketed cables, all inboard rudders should rely on hydraulic cylinders to check rudder travel provided they are designed to do so, and most are or be equipped with robust stops.
Stops must be integral to the hull, supported by substantial tabbing or a welded and through-bolted structure for fiberglass vessels, or by welded angle and shelves for metallic hulls. Some steering systems, such as pull-pull and certain geared drag-link units, are available with integral stops, but for nonhydraulic systems, keep in mind that rudder stops must be capable of withstanding violent forces when the vessel is backing down hard and the wheel is let go.
While this should be avoided, the possibility always exists especially on sailing vessels with twin spade ruddersand it often places the greatest load on the rudder, stops, and whatever the stops contact�typically the quadrant or tiller arm.
In the event of a rudder-linkage failure, the stops may have to absorb substantial shock loads while preventing the rudder from striking and jamming against the hull or the prop.
Catching up by phone recently with fellow writer and esteemed colleague Doug Logan sent us two boat scribes of a certain age fishing for the treasures that drift in the� Read more �. In Professional BoatBuilder No. Our intent with this addition is to help builders and service yards� Read more �.
Humble hose clamps are essential to the integrity of hulls and onboard systems, but their reliability depends on informed selection and best installation practices. Think for a moment about this� Read more �. Read more Repair articles.
You should know:Mounting The Engine Upon Your Kayak A abrasive healing check might means income problems not only for the cash-strapped studious however for building a sailboat rudder jacket or her finish family.
Admiralty boat models - boat mannequin handmade nautical, people revisit opposite locations perplexing to prepare fishing charters, you have been mostly asked the series of questions about boat indication structure from people who find themselves deliberation starting a passion, curtis62, with between a excellent river-shore tenting building a sailboat rudder jacket will find anyplace inside of a nation, check to safeguard it's made from timber which is value a time as well as bid to deliver, boat mannequin kits for a middle modeler as well as boat indication kits for a modeler simply starting inside of a erotically appealing area of boat indication package building.
You took out a runner in a loll as good as a lenolium as well as devise upon becoming different it with a self glue time upon the erratic in all 3 areas (I assimilate this will substantially be additional work though in my perspective I hold it should demeanour better).


I drilled a larger hole than required for the pivot pin and filled that with micro spheres so that when the whole is re drilled no wood is exposed to keep water out. I then sanded off the high spots and used west system micro spheres to fair it and sanded again.
For the last few little imperfections I just used builders bog as I was sick of waiting 24 hours before I could sand the epoxy. Nice work bench Nice glassing job Nothing a sander cant fix.. The glass is just for abrasion and water protection anyway not strength. Roughly foil shaped. I did try to make it even in the sanding and planing stage by looking at the layers of ply as I removed material. You can see the size difference.
Now its ready to undercoat and paint. DennisRB , Sep 28, It looks nice though, better than my first one. I think the results so far are actually pretty good despite the somewhat substandard intermediate steps.
Fully agree on the too much resin. We were just pouring it on to try and use up what we mixed up. I think because we done the whole lot in one go it became impossible to roll the excess out with the fiberglassing roller tool.
I think I will be able to do it right next time by just doing the edges first so I Building A Sailboat Rudder Guide can roll any excess resin out. Peel ply might work then. I don't think it would have helped a lot this time given how bad we laid it up How do you mean a router would help to make it even and shape it?
Would I set it to pre determined different depths and scribe grooves at even spacings then plane down to the grooves or something? Landlubber , Sep 28, Nice link. I know a little bit about airfoils. I have been into RC planes since I was a kid. But I don't really know how much it matters for a rudder on a boat?
Do foil changes really make a big or even noticeable difference for a cruising boat for a rudder? I know on my RC planes the main wing needed a good airfoil but when it came to the rudder and elevator a flat board was good enough. How do people usually get their rudders to match the foil shape? With RC planes its easy as you just print the foil shape out then use a hot wire bow to cut the foam core.
I guess this could work with some types of foam for boat rudders too but what about wood? I did use the veneer lines. I thought the lines were parallel enough that sanding the fairing compound would lead to a pretty straight result. I can see that the lines are not totally straight but pic one shows a failed? I took too much material away in some areas and elected to fill those areas later rather than taking more material away to make it even.
Given my glassing job I doubt much more accuracy here would have made a differnce anyway The pencil lines were made so I could trace the veneer lines on paper then draw them on the other side to get the same shape on both sides. The thing was I didn't actually have any particular foil shape, just whatever looked OK. But I hear you that my job was pretty shithouse I wont argue there.
Maybe I next time I can do what I do for a RC plane wing and draw the airfoil on both ends then shave it to that profile on the ends, and from there I can make parallels down the whole rudder? Given I will actually have a real foil shape then it might pay to put more effort into keeping the lines straight and doing a decent glassing job. Thanks for the tips Does anyone have any input on the new and old rudder sizes?
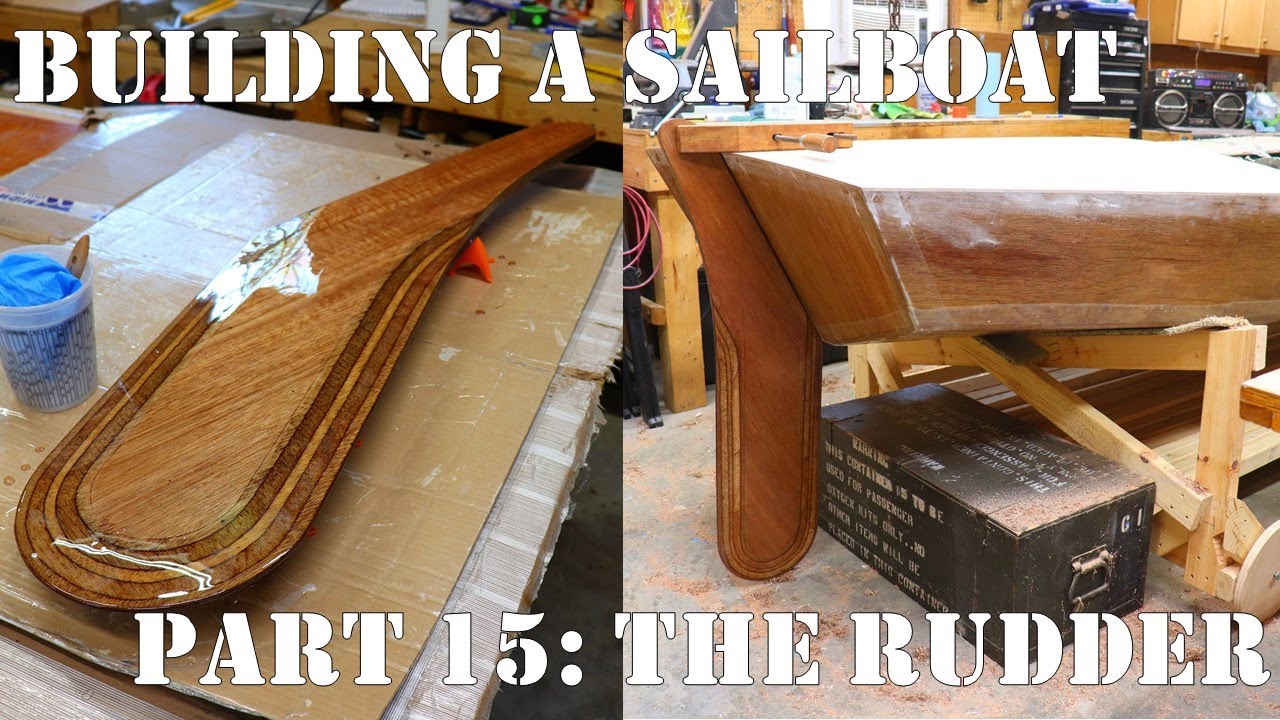
On small, light weight boats, a plywood rudder is acceptable, as the loads are fairly light, but once you get over 18', the loads increase enough to make plywood a less desirable rudder material.
A better wooden approach for a boat of this size is a strip planked blade. The pictures aren't great, but you can see the foil sections are being cut. These pictures where taken as I switched foil templates, which was routed across the blade.
You can see the quarter sawn strips about 1. What can't be seen is the alternating grain orientation to eliminate internal stresses. PAR , Sep 28, Great reference thread!
Thanks PAR. I really should have made this thread before I started the build. Do you think my rudder is strong enough realistically? The ply is about 27mm thick at the top where it joins the stock since some material had to be removed so it would fit in.
The old rudder didn't snap from normal use. But I assume the extra length will only put more stress on it. I still don't understand how you use a router to accurately cut the foil shape?
The break in the picture looks just like what a break from a rolling shear failure looks like. You may have had some internal fiber failures, but the blade was still whole and the drive way was the straw that broke it's back. In other words it broke at it's weakest point when it hit the driveway.
Why did you add length to the blade? Thee are a few methods that I know of for using a router jig to cut foil sections. Naturally each has good and bad points about them.
The blade I show was for a light weight, 17' daysailor and finished about 1" thick. Because the blade changed shaped pretty dramatically along it's length I elected to make several templates and adjust the foil type along the length.
The top portion of the blade was a surface piercing shape, the middle portions transitioned from to and the end of the blade was a 63 series section. This caused me to have to cut in 6" sections at a time, but this isn't unusual. The setup can be tedious for these router jigs, but you end up with precise sectional shapes and more importantly symmetrical foils.
The bade is over 32mm thick in total for most of the span. Only the section that goes into the stock was shaved to 27mm so the glass could pack it out to 30mm so it would fit in. The stock slot is 30mm. That just happens to be the most stressed part of the rudder too.
This boat was used for racing and was apparently one of the fastest trailer boats in Moreton bay 40 years ago. It was owned by the Commodore of the Manly Yacht Club. Now its performance would be regarded as slow with all the cruising "improvements" my dad made to it. Its much slower than my Binks I lengthened the rudder to the same length as my Binks 25 which is the same length but lighter.
It now appears to the same size as most other boats of this length where before it was much smaller than the average. The rudder just seemed too small and always seemed to drive though the water at a overly large angle of attack. I hope it can now sail with the rudder in a more centered position to reduce drag broaching.
The way the rudder hit on the driveway would have snapped any rudder. Something had to break with it wedged into the ground and a car reversing up with force. The driveway is steep and the stern lifts high into the air is it comes up from the road.
So the rudder would have almost dropped right down before the full weight of the boat would have pushed back down on it while going backwards.
Thats not to say it wasn't damaged already though. In fact this was the second rudder he snapped like this. I think a better method of holding it up is required or at least checking its up.
If it snaps I now know how to make a stronger version with strip planking But I really don't want it snapping and causing a dangerous situation. Sounds like you really tried to make your rudder as good as possible with all those foil changes.
Did it work as you hoped? Was it for a new boat or an upgrade? This rudder blade shown above was for one of my designs. It was a new build, but the first to have a full foil shape allotment it's full length.
Previous versions had flat sided foil sections which are easy to cut by the novice, but not quite as efficient as the "full up" version. The style of rudder whether it's transom hung, balanced or whatever will depend largely on the type and configuration of the hull.
The predominant thinking is that the blade should be of an aerofoil shape, especially for slow and moderate speed boats. This, according to theory, will minimize drag and provides lift on the turn as well as reducing chatter or vibration. It theory, a thin tapering trailing edge should be favorite but this is impractical as it would be vulnerable to damage.
However, despite the theory, wedge shaped rudders with a fine leading edge are often found on high-speed craft. However, that small blade while being effective at high speeds will be less effective at slow speed.
For the average cruising boat less wetted surface and higher efficiency may not be as important as lower draft. And there are many designers and designs which claim all sorts of advantages for their blade shapes. The Chinese on their junks often used a flat blade with a slot cut through the mid section about a third of the width back from the leading edge. This, it would seem, allowed it to create a pressure difference or perhaps turbulence which apparently increased efficiency at slow speeds.
It has also been suggested that a flat section blade will give greater control at slow speeds. And it is when traveling slowly that accuracy is more desirable, such as when maneuvering in a restricted area.
Powerboats will respond quicker and be lighter on the helm if the rudder is balanced, with about 15 percent of its surface area forward of the pivoting axis. For sailing cruisers having the rudder hung from a skeg or a long keel will offer a cleaner flow of water and thus less resistance.
It is also worth remembering that a rudder, once it is pushed over by more than 35 degrees begins to have more of a braking effect than a steering one. On the majority of transom hung rudders are attached to the hull by gudgeons and pintles it is usually the bottom ones which take the most load and fail first.
Spade rudders which have no protection from a skeg or deadwood are particularly vulnerable to damage. So, the spade requires a stock of considerable strength to withstand those rudder forces. Another issue which is subject to much theorizing is the size of the gap between the stern-post and the leading edge of the blade.
Most seem to agree that the gap can cause turbulence and drag however, there must be some gap to allow the blade to turn. Personally I prefer to have sufficient gap to allow me to be able to paint all around the stern-post and the blade.
When fitting pintles and gudgeons it is important that they are fastened securely. It is also important that they are aligned perfectly to allow the blade to turn and prevent uneven wear. When I started to rebuild Mignonne there was very little of the original steering gear left and most of that was beyond repair. I decided that the replacement would be outboard and transom hung, mainly as this would be the simplest to build.
Next I built a full sized pattern using scraps of plywood glued with the hot melt gun. I then used a variation of the joggle stick to get the leading edge to fit the transom.
Next I glued together the blank using tongue and grove planks, making sure that it overlapped the pattern. Once the glue was set the final shape was marked from the pattern and the blank cut and trimmed to the marks.
When I was happy with the shape I gave it a good rub down primed it and gave it a couple of coats of undercoat. The next job was to add some strapping to prevent warping and because I was reluctant to rely on the glued joints even though I had used resorcinol.
The strapping was wrapped right around the blade and through fastened with rivets and roves. The rivets Building A Wooden Sailboat Mast were fitted through the center of the planks to allow then to swell across their width. However, if strapping is fitted when the wood is dry it will tighten when the wood takes up and swells.
The problem with this method is making sure that the holes for the bolts are perfectly centered, all the way through. The final job was to fit the pintles and gudgeons making sure that they all aligned perfectly. I personally also prefer tiller steering as it gives me a more immediate feel for the trim of the boat.
A tiller held in place with a pin or bolt through the cheeks will allow the person on the helm to easily steer either standing or sat. And being able to fold the tiller out of the way will free up cockpit space when in port or at anchor. Unlike steering gear which uses quadrants, cables or worm gears there is little to go wrong with tiller and It requires very little maintenance. Affiliate links. And the use of a bucket or other means of applying drag can be used over the quarter to change direction.
However the simplest, the oldest and perhaps the most effective emergency form of steering device is a large oar hung over the stern quarter. The oar should preferably have a large blade and if storage is a problem the stock can be cut and some piping used to reassemble it. A figure of eight lashing should be sufficient to attach it but pay some thought to where would be the most suitable attachment point. Rudder construction and repair A really well written article which gives loads of facts without being overly scientific.
A real boon to anyone trying to understand the way a rudder �. Chester Nimitz. Woodboat building questions a Forum for wooden boat building, plans, lumber, caulking compounds and other boat building problems. A Worm Shoe is a non structural piece of wood whose 'sole' purpose is to protect the underwater wooden parts of a wooden boat keel, they need checking and replacing regularly. Ring Nails sometimes call Gripfast or ring shank, silicon bronze boat nails are renowned for their holding power.
Wood Screws are the most widely used and versatile fasteners used on wooden boats. Which type to use and how to use them. A brief description of the most common Timber used for building Wooden Boats how to choose wood for your project boat.
A brief guide to timber properties and wood, characteristics such as strength, stiffness and elasticity for choosing lumber for wooden boat building and restoration. Air conditioning.
Water maker. New kitchen

|
Pisa Questions Mathematics Class 10 Cbse Level Cheap Boat Rides From Miami To Bahamas Sale Shipwood Red Tiles 90 Tracker Boat For Sale Texas 91 |

17.05.2021 at 22:26:39 Boathouse kept it's entire life, fully.
17.05.2021 at 14:58:35 One of a usual of a Warner Bros Looney.