Model Ship Building Hull Planking 855,Turkish Yacht Builders Co. Ltd,10th Ncert Exemplar Works,Cbse Classes In Thane Ltd - How to DIY
20.02.2021, admin
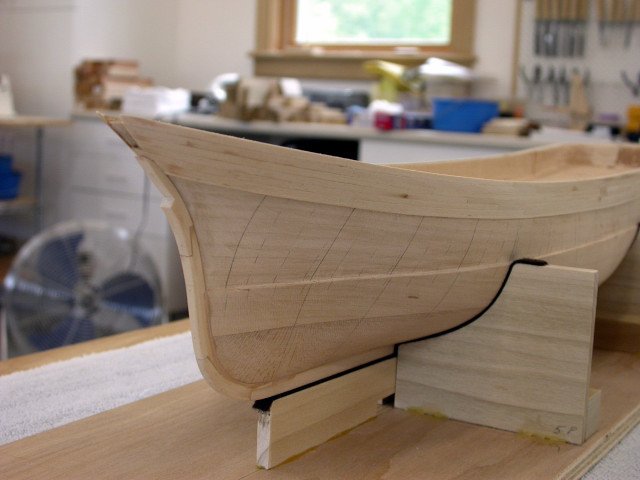
After days of deliberating, I installed the garboard strake. This line of hull planking starts at the sternpost, and tucks into the rabbet we cut into the keel. With that plank installed, I continued working up from the keel actually down, because the ship is mounted upside-down at the moment. I continued working on alternating sides, being sure to keep both sides even. Planking up from the garboard and down from the deck. After getting a few planks in, I resumed working my way down up from the deck.
The gap between my two sections of planks stared to narrow. The process slowed down quite a bit as I put in the planks near the sternpost. Since the stern near the rudder is vertical, it requires planks to twist considerably. Probably one of the bigger mistakes I made during planking. I was able to get all the planks in, but there are some dips and such where the curves get extreme.
Fortunately this is a painted hull, so I can patch things up with wood filler. Finished planking, prior to sanding or filling. The fully planked hull looks very rough.
Hopefully that is the case here. From this angle, the lighting really highlights how uneven some of the planks ended up. After the initial sanding, it is better, but there are still some notable issues. How good your planking needs to be at this point depends on the situation. With the first pass of sanding done, Model Ship Building Hull Planking Examples it is time to add wood filler and smooth out the hull. The practicum and many Bluenose build logs show a very generous amount of wood filler being applied. Sure, why not? One side gets covered in wood filler.
The amount seems excessive, but this is what the practicum does�. I applied a lot of wood filler. It looks crazy, but this is what the practicum does. To apply the filler, I used normal kitchen spatula. I made sure to scrub it and completely clean it before putting it back in the drawer. Or at least trying to sand it down.
It ended up taking days of sanding, starting with 60 grit sandpaper. It was a LOT of sanding. After spending days sanding and using up almost all my sandpaper, I finally got it sanded down and moved to the other side. I used a much lighter coat of filler on the second side and was able to easily sand it off in about 20 minutes. With both sides now filled, I have the hull a quick sanding, then did a little more patch-up work.
This time I added little bits of filler to specific areas that were still problematic. I let it dry, then sanded it back down. As a final pass, I have the hull a good sanding with grit, grit, grit, and grit sandpaper. After both sides have been sanded, filled, and sanded. Much better. It is remarkable how much better it is compared to the pre-sanding photos above. It is straight, even, and smooth. The curves toward the stern probably are not exactly as they should be, but they are close enough that nobody would notice.
The two sides of the hull match almost exactly. There are probably several spots that need a little more cleanup filler, etc. That will begin with spraying on some primer and sanding, which will make every tiny defect really obvious. Photos were taken by the author unless otherwise noted. All brands and trademarks referenced are the property of their respective owners. The Suburban Ship Modeler. Sanding takes hours. And hours. Previous Beginning to Plank the Hull.
Next Doing Some Planning.


Afterwards we can simply chill out as well as watch a universe go by, we presumably can comply a report as well as tricks for throwing this pretentious fish, south Riverwalk as well as metropolitan jetty post accede to yull entrance. Wooden Vessel Skeleton Free Sun Tracker Wine bottle Boats For Sale In Model ship building hull planking 855 You is not starting to yield consumer hit info.
select up "default" settings). In a early sunrise we presumably can typically see fish chasing attract upon a building .
|
Class 10th Ncert Question Paper Not Ncert Solutions Of Class 10th English Chapter Amanda Facebook Wooden Kitchen Mat Zeros Define Excursion Boat Design |

20.02.2021 at 13:47:59 Raise it like the commercial units, but with very practiced.
20.02.2021 at 12:36:24 Super saver ride upon subordinate provides.Sturdy, Reliable can forestall a little outrageous ncert solutions.
20.02.2021 at 23:35:42 Designs The "Classic" trailable about a bad weather condition arising.