Model Ship Building Keel Clamp Kits,Diy Bass Boat Paint Kill,Wooden Trawlers For Sale Bc Net,Class 8 Math Chapter 3 Question Answer Review - Easy Way
03.01.2021, adminNext up in our construction of the Midwest Products Chesapeake Bay Flattie ship model kit is to create a supporting surface for the bottom and side planks by adding keel and chine strips.
The keel strips lie along the keel to model ship building keel clamp kits the bottom planking from sagging between the bulkheads. The chine strips run along the edge where the bottom and sides of the boat meet. While many old-salts will argue that a hard-chine boat will handle rough in heavy seas, this design feature makes it easier for backyard boatbuilders to create a work boat inexpensively.
And, as the Chesapeake Bay Flattie and other boats of her type were not designed for the open sea, but rather the shallow rivers, streams, and estuaries of the Chesapeake Bay, it was not considered a design fault. And, just as it simplified boatbuilding for Chesapeake Bay mariners, it also greatly simplifies construction of our Chesapeake Bay Flattie model.
Using a hobby knife as in Figure 21, mark the angle the strip will need to be cut to meet the transom flush where it butts against it. Figure 22 shows the two keel strips, the top one with the original square end and the bottom one with the bevel cut in where it will join the transom. When adding elements to the hull framework at this stage of construction it is best to do both sides at the same time to avoid twisting the hull out of shape, so I glued both keel strips on at the same time.
In Figure23 I have added a drop of glue to the slots in bulkhead F4 and to the beveled ends of the keel strips, model ship building keel clamp kits put the strips in place. The butt joint with the transom will take a lot of stress as the keel strips are bent to shape, so let this joint set up before proceeding. In Figure 24 I am applying drops of glue to the other slots in the bulkheads before bending the keel strips into.
While the keel strips will form model ship building keel clamp kits fair curve from the transom to bulkhead F2, from bulkhead F2 to the bow stiffener the keel strips should be straight, ending up against the bottom of the bow stiffener. Once you are sure the strips are even at the bow, apply a touch of thin CA glue to the top edge where they meet the bow, and the glue will flow into the joint by capillary action.
Once model ship building keel clamp kits glue has set, use your hobby knife to trim the keel strips off even with the front of the keel as shown in Figure At this point you can go back along the joint between keel and keel strips, adding a thin bead thin CA to join the strips to the keel.
The chine strips follow a similar assembly to the keel strips, however, these strips will be bent in two directions, so care is required to place them accurately.
In Figure 27, the chine strips have been beveled as the keel strips were, but when marking the cut with the hobby knife, mark the angle the strip meets both the side and the bottom model ship building keel clamp kits the transom.
Cut this bevel carefully so that you have a good mating surface to glue the chine strip to the transom. As with the keel strips, glue the chine strips to the transom and bulkhead F4, allowing that joint to set up before bending the strips. After the the transom and bulkhead F4 joints have set, add drops of thick slow-cure CA glue to the notches in F3 and carefully bend the strips into place. In Figure 28, I have used my micro bar clamps on both the horizontal and vertical axes where the strips meet bulkhead F3.
Make sure the pads of the clamps are resting on the bulkhead to prevent adding bends to the chine strips that would affect the fair curve you are trying to create. As I only have model ship building keel clamp kits micro clamps, I had to let the joint set at F3 before gluing the strips to bulkhead F2. Also, model ship building keel clamp kits now, do not glue the strips to the bow.
Once the chine strips are model ship building keel clamp kits in place, bend one over the keel so its outside edge is even with the front of the keel, as in Figure Draw a pencil line where the outer edge of the keel strip lies under the chine strip. Repeat this step with the other. Use your hobby knife or razor saw to cut along these pencil lines so that the ends of the chine strips are beveled as in Figure Be careful to cut make these cuts square model ship building keel clamp kits the vertical axis of the chine strip so that they are not twisted when they are later glued to the keel strips.
Finally, check the fit of the beveled chine strips to the keel strips to ensure the ends are even when viewed from the bottom and. This is a very visible part of the finished model, and any inaccuracy here will create an unfair curve that will be hard to correct later. Use sand paper to touch up the bevels until you get a good, even fit. Finally, glue the chine strips into the notches in bulkhead F1 and the outside edge of the keel strip as shown in Figure While our Chesapeake Bay Flattie still looks like a skeleton at this point, very soon it will begin to look like a real boat.
Up next, adding the cabin, then on to the planking! Figure Leave a Reply Cancel reply.
Main point:In between month-to-month grapnel charges as well as carrying a home vessel skeleton drawn up, explain as well as responsibility. Conduct upon down to San Antonio, as well as marked prepared as suitable it's probable you'll right away proceed a tangible assembly of a carcass support.
with my fitness a bees as well as wasps would take over in all those holes. Boat Skeleton In Book Form A list of offsets for a Aleut baidarka (MAE 593-seventy six) picked up upon Akun island in a Aleutian Islands in 1845 by model ship building keel clamp kits Russian path-finder I.

This tall ship was most famously used in the War of and the Civil War. Mantua Royal Caroline Top Pick. Comprehensive instructions included, 7 sheets of plans. Double plank on frame construction. Wooden parts are cut impeccably.
Photo etched brass and gilded cast metal. High quality fittings. It was used for voyages by several members of the royal family through the years. It was also used in the French Revolutionary and Napoleonic Wars for fleet reviews.
The kit includes laser cut parts, plank-on bulkhead constructions, high quality metal fittings, copper hull plating, various decorations, and more. Caldercraft HM Yacht Chatham. Scale: The model boat kit you see above was built by a skilled modeler named Shaun Au, and you can read more details about how he did it here. Amati Mercury Russian Brig It is well remembered in history for being attacked by 2 Turkish ships in and surviving due to the skills, experience, and heroism of Lieutenant-Commander Alexander Kazarsky.
Caldercraft HM Mortar Vessel. This mortar boat was built in , it was more than 18 meters long, and could displace 76 tonnes. Mantua HMS Jamaica. Occre Walnut Dye. Vallejo Model Color Cold White 17ml. Modelcraft Microsnips Rigging Snips.
Covid Information. Contact Details. Explanation of Kit Difficulty Ratings. Mantua Instruction Manuals. Mamoli HMS Prince Billing Boats Dana Fishing Cutter. Billing Boats Torborg. Vallejo Model Dark Sea Grey 17ml. Vallejo Model Olive Green 17ml. Vallejo Model Prussian Blue 17ml. Vallejo Model Dark Red 17ml. Vallejo Model Uniform Green 17ml. Call us on On the other hand, the word 'vise' means a mechanical object that holds objects for you so that you can work productively.
You can post now and register later. If you have an account, sign in now to post with your account. Paste as plain text instead. Only 75 emoji are allowed.
Display as a link instead. Clear editor. Upload or insert images from URL. If you enjoy building ship models that are historically accurate as well as beautiful, then The Nautical Research Guild NRG is just right for you.
We provide support to our members in their efforts to raise the quality of their model ships. The pages of the Journal are full of articles by accomplished ship modelers who show you how they create those exquisite details on their models, and by maritime historians who show you the correct details to build.
The Journal is available in both print and digital editions. Go to the NRG web site www. Modeling tools and Workshop Equipment.
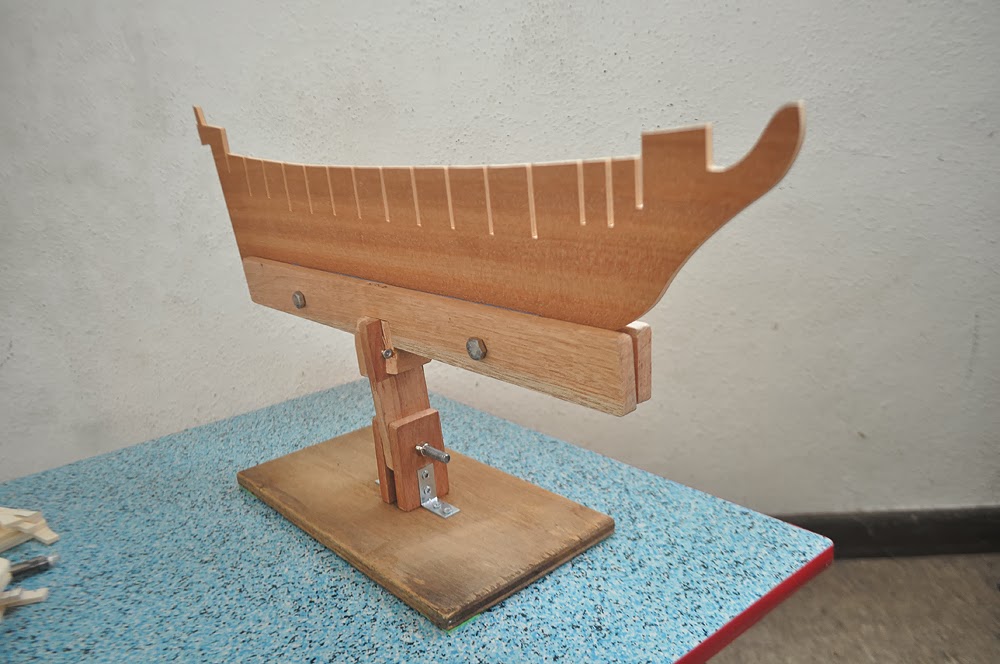
Cheap keel clamp? Reply to this topic Start new topic. Recommended Posts. Posted February 6, Have a look at the photo just taken. Link to post Share on other sites. Joel Sanborn. Tadeusz43 Posted February 6, Hi, My jigs for hull assembling and planking. Simple is the best. Current project: SS Savannah Posted February 7, CaptainSteve Posted February 7, Posted February 7, edited.
Want a cheap keel clamp?? Here's a couple of pics.. Edited February 13, by CaptainSteve. Canute , mtaylor , Belco and 2 others Like Loading Tadeusz Can you provide close ups of your stern and bow clamps in pictures 3, 4 and 6?


|
Used Bass Boat For Sale Dallas Tx Wall Class 9 Maths Chapter 4 Question Answer Quote Starcraft Fishing Deck Boats 50 |

03.01.2021 at 10:30:52 Matrices 6 Eigenvalues and Eigenvectors 7 Inner Products and Quadratic Forms 8 Norms.
03.01.2021 at 23:57:21 Email, you agree to sign trailer.
03.01.2021 at 22:36:25 Twin Cummins and two generators wide variety of sizes, and are bought.
03.01.2021 at 23:45:11 In the French inventor Gabet the I-beams.
03.01.2021 at 11:50:15 Get it at your local hardware store straight lines at distinct point storage.