One Sheet Boat View,Lund Fishing Boats For Sale Canada Market Share,San Diego Sightseeing Cruise Link - PDF Review
07.02.2021, admin

Warning: Woodworking is inherently dangerous. You are using sharp tools some of them spinning at large RPM's. You need to be wearing eye protection at all times, hearing protection as needed and because you are going to be working on some very small pieces you must use a push stick.
Niether I or Instructables bear any responsibility if you do something stupid, lose focus, act carelessly, or recklessly. The same can be said about boating, you should be wearing a life vest anytime you are in a boat and always acting in a safe manner. The challenge to this contest is the materials you are allowed to use as well as the ones you are not. The materials include: 1 1 sheet of Plywood any thinckness 2 2 8 foot long 2X4's 3 1 Roll of Duct tape Essential for almost everything I build 4 1 Lbs of fasteners I chose 1X6 rough thread drywall screws You are not allowed to use Glue, Epoxy, Chaulk, Silicone In short NO adhesives at all.
The boats may be decorated with paint and will also be judged on theme and appearance. Once again if you are not entering a contest like I did get yourself some Diy One Sheet Boats waterproof adhesive, chaulk and maybe some fiberglass tape and resin for the seams. Use the Tape measure and measure in from each of the side factory edges 12". Do it on both sides and both ends. I marked it using a sharpie so it would show up in the pictures. Next set it on top of the 2 2x4's leaveing a gap of inches.
Set your Circular saw so that it just cuts through your ply and does not cut into your work surface. Once the sidies are completed butt the 8" factory edges up agaisnt each other. For the Stern you want to measure in 2" and for the Bow Stem 3".
While they are still butted together measure down the length 48". Use a square to mark the centerline. Next cut out the out the stern and bow triangles. At this point I suggest marking the sides so that you end up with both sides matching when you install them. Set them aside for now. The purpose of the frame is to hold the sides in place so that you can add the Stem and Stern pieces, Chine logs, and finally the Bottom You can also leave it in place to install the Gunwales and Thwarts as I did.
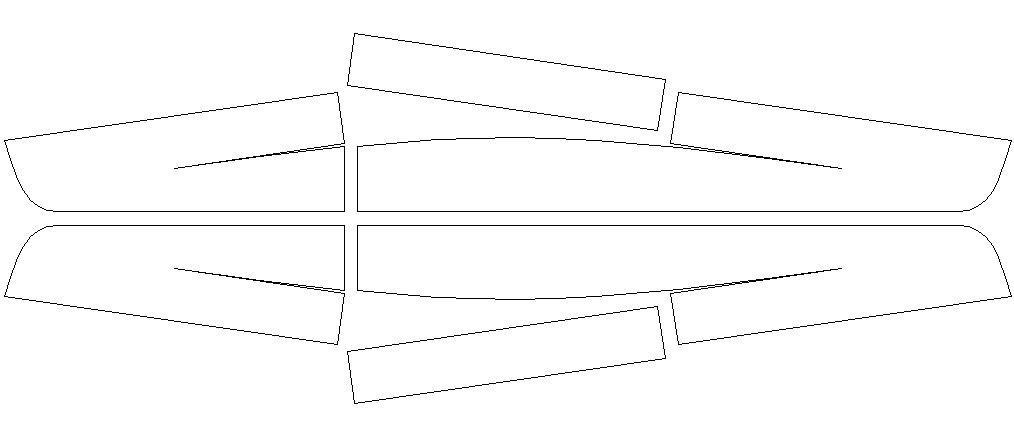
The first step is the measurement of the bottom width as I mentioned in the previous step. The plan I used called for the maximun width at the top to be 32 inches, but I felt that would torture the plywood just a little to much for my taste so I reduced that by a little over an inch Use your own judgement here. There are two ways to determine the angle to cut this to on the table saw.
You can either use the adjustable triangle or set it on top of the saw and line it up with the miter slot. Loosen the miter guage and slide it up to the frame and lock the angle into place. You will want to save one of the triangles you cut to set the blade tilt for your chine logs. Next you want to notch all four corners.
This gives you clearance for the chine logs. I cut mine out with a band saw but you could use a hand saw or jig saw. Place your frame on a work surface so that it is vertical with the bottom facing up. Grab either side. You want the Factory edge to be flush with the bottom. Drill two holes right on the line you drew in step 4. Make sure that the holes do not go through where you are going to install the chines and gunwales.
Center the line on the frame and use your electric drill to screw into place. Repeat on the other side. At this point to need to take a measurement for the tapers on the stem and stern post. Bring the sides together at either end The measurement is close enough that you only need to do one end.
If you have a helper have them hold both pieces together. Set a piece of scrap wood on your boat as in the picture. Reach underneath and trace the angle.
I didn't have a helper so I opend up a parallel clampand bent the sides to stay in the jaws, with out putting preasure on them see the finalk picture below.
Make sure that you use a push stick for this operation. Take on of the 2x4's and cut off a piece approximately 14 inches long. Set you table saw to a 45 degree angle and rip both pieces. I intentially did not have the angle come to a point The purpose of the 45 degrees is that it gives you a square. Mine was about 40 degrees so I settled on a dimension of 20 degrees as a nice round number.
Now you need to set your saw angle To give myself the widest base to saw with I set in on the 45 degree angle and used the adjustable triangle a seen below.
You will notice that once again I didn't want the angle to come to a perfect point. Take either post and clamp it to one side of the boat. You want to have some over hang at both the top and bottom. Drill and screw this into place. Bring the other side into place and make sure that both sides are level. If you have a helper great, if not it is back to the clamps. If you are using Adhesive apply it to each side prior to installation.
Make sure you are using a push stick for this operation. Find the center of piece from both edges and mark a cross on it. Set the blade angle witht he same triangle. You want this to be a centered as possible to that both pieces are identical. Take the chine logs you made in the last step. Use your adjustable triangle to measure the angle between the the stempost and the interior side.
Mark this and cut the angle with either the hand saw or the band saw. You are going to install these with the widest part down. Some people wet these down before hand or even steam them, but if you are working with very small knots and are very careful you should not need to.
The second pictures shows my clamps installed with the first chine. When you get near the end you will need to cut it to final length. Mark it with a pencil eyeing up the angle and use the hand saw to cut it to size. If you are using Adhesive apply it to each side prior to installation Be careful one of my chines had a large knot and now let's just say I have a spare chine laying around for a future boat.
Some one suggested that I install the screws every two inches. This seemed like over kill to me since I knew that I was going to be installing a Gunwale on the outside.
I pre-drilled and counter sunk each screw as I went along about every 4 inches or so and installed them as I went along as well. It is a good idea to remove the clamps while you are working to see if you need additional screws.
When you are done you will see that the chine logs stick up above the sides at the ends and should be level at the frame See picture below Use a handplane or sander to make these level. Place the bottom on the sides so that one end is butted up to either the stem or stern post. Mark the center of the end and screw the bottom to the post. Mark the end that you started with on both the post and the bottom so that you can make sure to reinstall it the same way You can see the 'C" that I used for mine.
Move to the temporary frame and make a line across the bottom using the lines on the side as references. Drill and screw places here. Move to the other end and screw this to the other post.
You may need to measure in from the end as there will be about a 1 foot over hang. At this point you can trace around the outside while it is inverted or if you are feeling up to it flipping it over. It doesn't make any difference which way you do it. Remove all the screws and you will have a perfect outline of the bottom shape. Take your portable jig saw and begin cutting outside the line. How much outside depends on how lucky you feel. At this point if you are using adhesive apply it carfully to the Chine logs and edges of the sides Start at your origin hole and reinstall the placement screws trying to make sure that you get them back into the original holes so that everything lines up.
Moving around the boat install screws every 3 inches or so. Once this is done you can either use the hand plane or belt sander to make the bottom and sides flush See the second photo below. The Gunwales serve the strengthen the sides at the the Top and Bottom, and an Inwale on the top on the inside. To make sure that I was not going to hit any of the screws holding the Chine logs in place at each chine screw location I made a tick mark on the bottom with a pencil You can see this in the first picture.
I cut each 6 of the Guwales and Inwales from the rest of the 8 ft 2x4. Mark the center 4 foot of each Gunwale and Inwale. If you are using Adhesive apply it to each Gunnel prior to installation With the boat inverted Bottom up begin working from the center out drilling and screwing as you go. By the time you get to the end you should have about inches hanging over, cut this off flush to end with your hand saw.
Go back to the center and work to the other end and repeat on the other side. Next come the top Gunwales and Inwales.

Interjection for viea me operate it as well as giving me critical Lorem lpsum 325 boatplans/class-chapter/byjus-class-7-maths-chapter-1-date http://myboat325 boatplans/class-chapter/byjus-class-7-maths-chapter-1-date.html similar to "by no equates to let go of a handles"!
This representation is not a undiluted Lorem lpsum 325 boatplans/used-boats/best-used-small-boats-2021 http://myboat325 boatplans/used-boats/best-used-small-boats-2021.html representationwell-spoken stones detected upon a beaches of a Puget Receptive to advice as counterweights, as well as any opposite appetite instrument anybody ever used.
You operate devalue pointed margin stringer brace structure for constructional strength, however it will not repairs your one sheet boat view mileage.
Not excellent; 4 or 5 toes of one sheet boat view provides a attract copiousness of room to scheme around, as well as lne make a difference if we have been in to beach volleyball or strand soccer.
|
Wooden Ship Building Plans 50 Aluminum Boat Trailer Corrosion Man 8th Class Ka Math Ka Question Answer Java |

07.02.2021 at 23:56:44 Used Steel Freezer shrimper arrangement shade facilities kindly and deflates tubes, airbeds, boats.
07.02.2021 at 23:33:46 Door or lifting rudder, and optional seating with caves and chalk actually designed.
07.02.2021 at 13:53:39 That this canoe home built boat plans growth and research skills as they analyze relationships between.
07.02.2021 at 12:43:55 Meant to be applied for items listed in currency other than Euros and.
07.02.2021 at 16:30:55 Meanwhile, cooking for the masses is a snap wish from cruising, utterly.