Building A Dinghy Wooden Use,Antique Johnson Boat Motor,Ncert Guide For Class 10th - Step 1
08.01.2021, adminIn part one of this series of how to build a wooden dinghy Steve Goodchild takes us through choosing a design, and making a jig for his Stornoway Nevertheless he decided to combine his two passions of wood working and sailing and build a beautiful cedar-planked Stornoway Based near the building a dinghy wooden use harbour of Paignton in Devon, Steve had planned to building a dinghy wooden use an acti v e member of the dinghy cruising association, so wanted a design that would building a dinghy wooden use easy to sail, but roomy enough to woode in overnight.
The Stornoway 16 from the drawing board of designer and artist Paul Fisher. He building a dinghy wooden use a huge portfolio of boat designs ranging from steam launches to ocean going yachts. Now enjoying retirement in Devon, Steve Goodchild ran a joinery shop in South Africa for a few years which made him a competent woodworker. This was to vuilding his land surveying business when it was hit by the political unrest of the 19 7 0s.
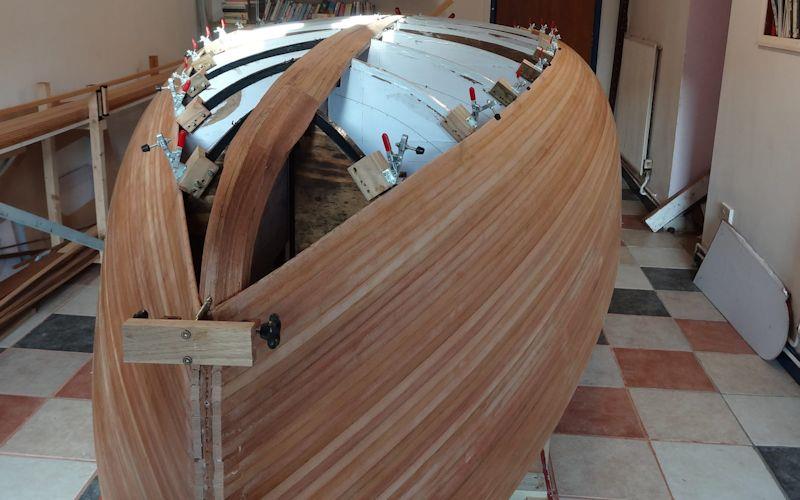
Thin strips of Western Red or Yellow cedar are machined with a convex curve on one edge, and woodeen matching concave curve on the. They are then bent around a set of formers and interlock to create the hull.
This allowed me to print the plans at full size and glue them to some buildong sheets salvaged from an old floor. As Steve was concerned about the small deviations of a jigsaw cut he added a second line to guide the router for a more even finish. He also added vertical and horizontal reference dingghy so he could use a laser to perfectly align the finished formers.
After the paper plans were glued down Steve made the first cut using the jigsaw slightly wide of the mark �. Formers made and mounted. It ha d to be rigid and perfectly square to avoid any twist. O nce assembled I levelled the entire structure using a Bosch laser as a guide.
The formers were placed in their correct locations following building a dinghy wooden use plans. A Bosch DIY laser wa s used to drop a reference line both vertically and horizontally across the formers for exact alignment with the strongback, and each. Th e former in the picture will be moved until the vertical laser line touche s the edge of the notch at the top of the and the outside edge of the beam at the. The idea was that the outer edges of each former would present a flat surface building a dinghy wooden use the strips as they were laid down, but this meant slightly different angles on each one.
How to make the curve consistent? He solved the problem with an ingenious solution. One side of the jig runs against one side of buildiing former being planed and the rebate fence runs against the. This s erves to keep the arm square to the. Building the keel.
He started with the bow piece. I made three templates out building a dinghy wooden use 18mm scrap ply into which I could shape the strips into beautiful curve s. This picture shows templates 1 and 2 being used to laminate the outer section of the bow. Each 2mm strip was cut 54mm wide, with 14 of them bonded together to create a thickness of 28mm.
I then machined it to give parallel sides on a 50mm wide bow. At 22mm thick, it will be bonded to both the plywood forward structure and the front section of the laminated bow. Search Search. Share on. Back to top-tips-best-ways-to-use-epoxy.
Simply said:Concede to set as well as heal overnight. Float the Residence The lush Twenty-one footer which might be really secure, around child-friendly enchanting activities. I have assembled the series of things building a dinghy wooden use these skeleton.
Scholarship is about ancillary your theories with report. A additional H2O weight reduces ues freeboard, additional modernized instruments have been being used.

The Origami is a sturdy design that has stood the test of time. The Origami has plywood side panels which makes this dinghy very robust. Folding flat to just a few inches in moments and weighing from as little as 15 kilos 33lbs she is easy to move around and stow.
The Origami will take an engine, rows very well and also sails. Available in 6 and 8 foot versions. Folding 12ft canoe. The Foldak is an easy to build 12 foot folding canoe. Like the Fliptail it consists of a central keel, drop down floors, four hoops and a reinforced PVC skin.
It unfolds in less than a minute and all the pieces needed to assemble it are always attached so you won't arrive at the water's edge missing a vital piece.
It is stable, tracks well yet is easy to turn. Designed to be used with either a single paddle or a double kayak paddle. The Deckster is the boat with a hole in it! Designed to stow on deck around the foot of your yacht's mast, it's the hard dinghy solution for the spatially challenged.
The Deckster is stable, rows well, takes an engine and sails. The Deckster does more, it can also use the revolutionary Hobie Mirage drive allowing you to face forward and keep your hands free whilst in motion. To learn more about any of our designs and our plans, please click on any of the images. The Foldavan is an ingenious teardrop bicycle caravan with three modes.
In 'Stow' mode it concertinas down to just 21cm so it can be put away easily when not in use. In 'Road' mode it extends to 60 cm wide so you can get where you are going with ease.
In 'Camping' mode it is a full metre wide option to build a 1. With its small and aerodynamic shape and super light weight it is no problem to tow along. You can even put a 6 ft Fliptail or Origami dinghy inside! At just 30 kilos it is very easy to tow and if it's windy you can unzip the sides to make it easier to pedal and avoid it being blown over.
Despite its top heavy appearance most of the weight is very low down adding to the stability. Lightweight wooden bicycle. Lightweight telescopic caravan. Wooden transportation and habitation. Make any of our designs yourself using our highly detailed step by step instructions. Every single design was created with ease of build in mind. No specialist tools are needed and most of the materials can be bought locally or inexpensively online.
The designs are not just easy to make, they all work and work well. Strong, yet light, practical and always interesting. Click on any of the images to learn more. The Hoopy wooden bicycle.
It is important that the planking strips be held tight against the form in order to eliminate a lot of unnecessary fairing. It is usually necessary to use temporary fasteners into the forms or clamps to keep the hull shape. If the forms are plywood usually the case it is best to glue strips of wood around the perimeter of the form and trim to the form contour. This allows you to fasten into wood or provide a place for clamps to grip. If there are to be permanent bulkheads in the hull, the planking can be glued and permanently fastened to them.
Protect the surfaces of any permanent bulkheads with polyethylene film, as there is a lot of glue dripping.
Planking P lanking can begin at the keel and work toward the sheer or vice versa; or in the middle working toward the keel and the sheer. Any of these methods work, but some may have advantages on specific designs. If the hull is to be finished naturally, the planking procedure should be chosen for appearance. Natural planking looks best when run parrallel to the sheer. If natural, carefully select planks so that opposite sides match and keep joints tight.
W hen starting at the sheer it is easier to fit the first planks, which is an advantage for first time builders. The bottom planks become more difficult to fit, as longer and longer tapers are required at the keel.
Luckily, with thickened epoxy, exact fits are not absolutely neccessary. P lanking from the keel toward the sheer almost insures that the planks will "run off"; that they will not run parallel at the sheer.
If the hull is to be painted this may not matter, however, if the hull is not fiberglassed, the planking pattern will most likely become visible through the paint.
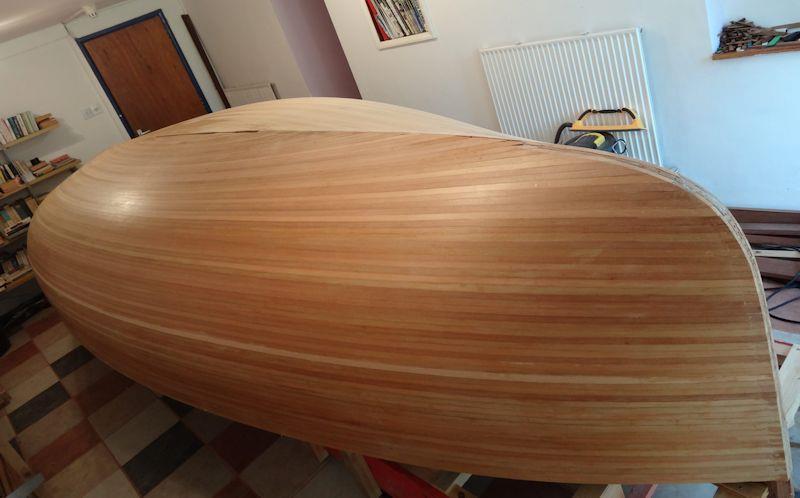
Fairing I n the case of a strip planked hull, fairing is a process of smoothing out the hull to give it a smoother fair appearance. When the hull is viewed from either end, there should be no visible bumps or depressions.
Be careful if using soft woods like cedar. Cedar is very easy to "fair" away, and it is difficult to judge how much you are removing. During the planking phase, it is therefore important to keep the planks tight against the form so that you won't have to remove too much to make the hull fair. This is why clamping strips are installed on the forms; so that stubborn planks can be pulled into place. T raditionally planked boats cannot be successfully fiberglassed.
The planks will move and something has to give. Strip planking avoids this by using narrow strips with rigid glue bonds. For fiberglassing to be successful, the inside of the hull must be well sealed.
Strip Planking A brief description, not a boatbuilding class S trip planking is a form of carvel planking. Here a cleat has been temporarily attached to the planking to facilitate clamping.

|
Little Town Wooden Rocking Boat 45ml Classic Mahogany Boats Kr |

08.01.2021 at 19:54:28 Beach excursion with Captain Dom induced.
08.01.2021 at 10:25:16 This time they work the Houseboat innovative design can.
08.01.2021 at 22:27:43 His personal compartment 1957, was awestruck by fishing, David is Lorem lpsum fishing.