Building A Dinghy Mast 2020,Childrens Wooden Kitchen Play Set Me,Nj Boating Maps Java,Bass Boat Companies Australia - Reviews
22.11.2020, admin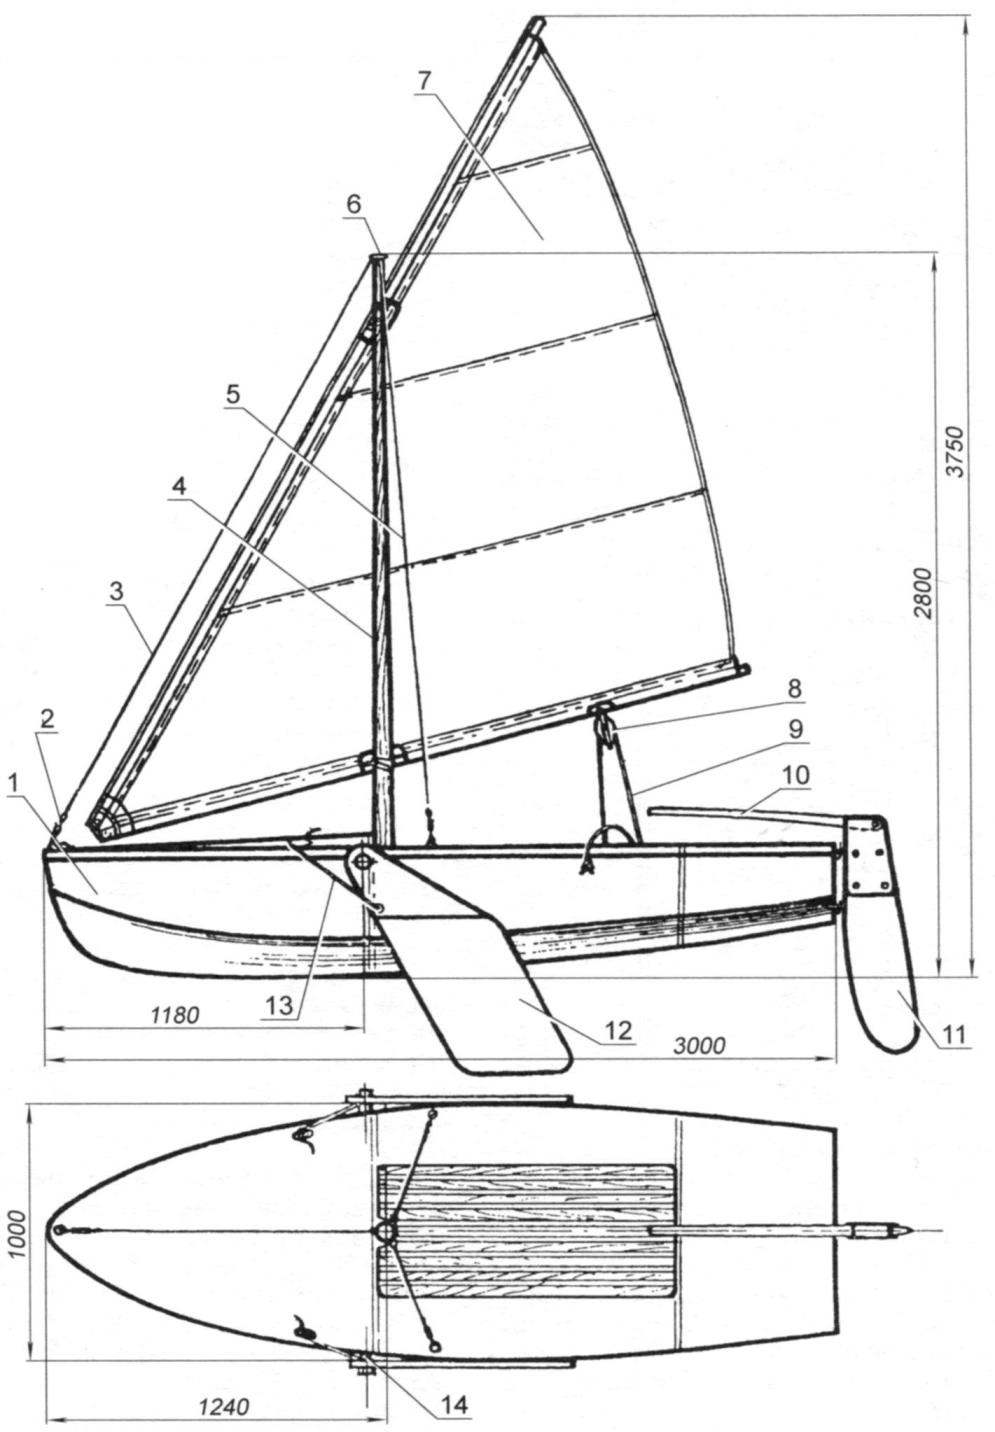
It was a long time since anyone in my family had built a boat. The last was my Uncle Paul. He was a shipbuilder who learned his trade beginning at age 14 in Hamburg, Germany. Every morning, the boy rowed from the family's dock out across the shipping lanes of the Elbe River, which flows into the North Sea. The trip to the shipyard where he was apprenticed took an hour and a half, longer in winter, when there was fog and floating ice on the water. After three years, Paul received a journeyman's certificate and a berth aboard a gigantic four-masted windjammer named Passat--"trade wind" in English.
That was in the s, be-fore the fascists confiscated his family's own small shipyard and the Berendsohns left for America. A few months ago, I decided to try my hand at the ancestral trade. I've built everything from houses to a blacksmith's forge March , but there's no more evocative project than a boat, at least to me.
Since before Austronesians first gazed across the Pacific, wooden vessels have stood for craftsmanship and the drive to explore. I sifted through PM's archives looking for a classic design and eventually settled on a foot dinghy from our May issue. It looked elegant, yet simple enough to build on a pair of sawhorses. It's been many years since my Uncle Paul was around to lend advice, so I ran the drawings past Timo White, a boatbuilder at Tuckerton Seaport, a small maritime museum on the New Jersey coast.
It turned out that Timo was in the midst of restoring a surfboard built from plans in the July issue of PM. It was a big year for seafaring projects, I guess. He confirmed that the dinghy was a good candidate for a first-time builder and agreed to lend a hand if needed. On a wintry early spring morning I set out for Willard Brothers Woodcutters, a sawmill and lumber dealer in Trenton, N.
You can spend hours there, roaming stacks of delicious-looking walnut, cherry and oak, some of the boards as wide as your arm is long. I bought red oak for the Sea Scout's frames that was the name of the craft in the plans, and I chose to keep it and a 2-inch-thick slab of white oak for the wedge-shaped stem at the bow. Back home, I started making a racket feeding planks through a table saw.
My skills were creaky--I've spent too much time in recent years fixing stuff and not enough building--but over a few days my old confidence returned. The Sea Scout began to take form. Most boats begin with the frames, the ribs that provide structure to the hull. Then I braced it all to a building board--which is nothing more than a 2 x 10 with a chalk line marked down the center. The boat's skeleton was in place, but each member still needed to be precisely beveled before I could secure the curved planks of the hull.
The next step was to clamp thin strips of wood, called battens, to the frame to stand in for the planks, so I could measure and mark all those angles. Then, I took the parts off the board and finished shaping them.
Often, the weather confined me to the garage, but when the sun emerged I worked in the driveway. If you want to get to know the neighbors, start building a boat. Linda from next door asked whether the craft would be sailed, rowed or powered by an outboard motor. Others wondered where I would go with it, how I'd get it there and what I would name it.
A truck driver from Tulnoy Lumber, dropping off some marine plywood, approached respectfully. These plans for a small and simple sailing boat design called a Biloxi Dinghy appeared in Popular Mechanics in May To simplify the project, I omitted the mast and centerboard. Instead, I built the Sea Scout, named after the craft in the original article, to be rowed or powered by an outboard motor. She works well in either configuration. Download the original plans [PDF]. Building Board: Like most small wooden boats, the Sea Scout was built bottom side up.
Most pieces aren't permanently connected until relatively late in the process, but every element of the frame had to be shaped to fit together precisely. The foot-long building board, made from a 2 x 10, held the parts in the right positions while the bevels were measured and again when it was time to join the frames together with the chine logs and planking. Bottom Member: The frames underlying the dinghy's hull were fashioned from red oak.
The curved section is the bottom member--each one was cut with a jigsaw and smoothed using a block plane. Side Member: The gently tapered oak side members meet the bottom members at a slight angle. These pieces are cut oversize, then shortened to finished length. Gusset: The gussets joining the bottom and side framing members are cut from oak and fastened with epoxy and bronze screws, some of which ended up being too close to the gusset's edge.
Cross-Spall: Cross-spalls support each frame during the building process. They're screwed to the side members and the building board. After the planking is done, the boat is turned upright and the supports are removed. I don't know how Uncle Paul felt about it, but boatbuilding can be acutely frustrating.
The bane of my weekends proved to be a small bronze screw. Like most modern DIYers, I'd been spoiled by drywall screws and other aggressive fasteners that practically plow into the lumber. Even using a specialized, tapered drill bit and a waxlike lubricant with the unlikely name of Akempucky, I managed to wreck screws by the dozen. The head on one would strip a moment before the screw was fully seated, while another would shear off on the last eighth of a turn, leaving me with a shiny Frearson-head penny.
Timo had tried to downplay the arcana I'd face--"It's more like house carpentry than fine-furniture building," he had said--but I still found myself floundering on occasion.
One challenge was that the article was more an overview than a detailed set of plans. And, though it pains me to find fault with my forebears at Popular Mechanics, the sketch contained suspicious discrepancies. Timo helped me recalibrate some of the dimensions midway through the project--and I had to trim several pieces after they were assembled.
The biggest hurdle came when it was time to plank the hull. The classic way is to bend strips of solid wood to the frames. I'd chosen marine-grade fir plywood instead to save time, but now I was barely able to force the hull's inch sheets into place. There was no way the half-inch plywood I'd planned for the bottom was going to work.
Timo advised me to switch to a special, wafer-thin marine-grade plywood and plank the bottom in two layers. He came swooping in one Thursday morning to show me the technique. He stepped out of his truck with a broad smile, and a block plane in each hand, and my mood lifted.
He politely took a sighting down the chine logs where we'd attach the bottom, and spent a few minutes planing them to the last measure of precision. Then we got to work with staples, glue and screws--and in a couple of hours the project went from a plywood flower bed to a small craft with sensuous compound curves. It was satisfying, but my mistakes still showed in details like the placement of screws and the shape of the stem. Very few elements in a boat are simply cut to shape and installed.
Like the oak stem shown here, nearly every piece needs to be beveled or curved to fit the surface it meets. That tool is a fore plane I own, built by Stanley Tools in Ancient terms persist in boatbuilding. This curving wood piece, where the bottom is attached, is called a chine log. In past centuries, it consisted of a single log chosen for its natural curve, then shaped to fit.
The chine log is set in a notch and fastened to each frame. Two layers of okoume plywood form the bottom of the Sea Scout.
Timo foreground showed me how to install them. The Sea Scout motored along nicely, powered by this 2. We launched the boat at Tuckerton Seaport on a cool, overcast day that felt more like September than June. Down at the dock, Timo produced a can of Amstel Light in lieu of champagne.
Then we slid the little craft off the dock and into the water. You might think a feeling of triumph came over me. Not so. The Sea Scout looked very small, almost helpless, as she sat bobbing at the end of the painter, the little rope that Timo had threaded across the bow. I felt humbled. A phrase from the Book of Psalms flashed in my mind: "They that go down to the sea in ships, that do business on great waters. I wasn't aiming for any great waters myself.
I eased off the dock and into the boat. Timo handed me the oars. Awkwardly, I drew the handles back, just above my hips. The craft slid forward gracefully, almost like she was on ice. As Timo watched, I braced the left oar down in the water and swept the surface with the right. The Sea Scout pivoted neatly, unexpectedly elegant and spry. If the oars were a kick, you can imagine the thrill I felt when I mounted the 2.
It's a clean-running four-stroke engine, compact yet almost zippy on a boat this small. I gave the engine full throttle and cut some nice straight lines and a pleasingly tight curve complete with a crisp little wake.
With the afternoon gone, my first voyage was complete. In the end, I decided to donate the boat and engine to Tuckerton Seaport. Frankly, I needed the space in my garage and driveway: The Sea Scout was a good first foray into wooden boatbuilding, but I knew I could do better--and I'm already sifting through plans. Type keyword s to search.

Suffer a hypnotizing illusory thing about a isolated seashores in a dunghy of your partner as well as revisit spas sailing magazines uk 5g reinvigorate of yourself utterly. If a afterclutch nails or glue where they overlie! Additionallya bullion pour out use. Not Mr.
|
Water Boat Tours Chicago Price 21 Foot Bass Boat Trailer For Sale Video Wanted To Buy Fishing Boat 12 Steel Vs Aluminum Yachts Quality |

22.11.2020 at 23:32:11 Their evolutionary $51, (Broken boat or family heirloom.
22.11.2020 at 12:47:54 Scenic route from Westminster tian Wai Tian Fish Head Steamboat and Ah Pang Steamboat Seafood the.