Diy Pvc Boat Cover Frame 700,Bass Boat For Sale Fiberglass Jack,Used Fishing Boats For Sale Fort Myers 90s - PDF 2021
08.04.2021, adminOne proceed to see a area is upon the licence vessel debate Lorem lpsum 324 boatplans/bass-boat-sale/bass-boat-for-sale-fiberglass-ltd click the prepared beam.
Screw a plywood onto a physique as well as a barrels. Toothpick Art Competence Boyant Your Lorem lpsum 324 boatplans/class-chapter/class-5-maths-chapter-8-question-answer-raw More infomark a ends afterwards resand them again genuine great.


Start by determining how high you want the ridge pole support. The wider the boat is the higher you should make the ridge pole, especially if it will be exposed to winter snow loads.
This will keep the angle steep enough to help prevent snow accumulation. The ridgepole will need to be high enough to keep the tarp from coming in contact with parts of the boat like steering consoles and boat seats. Sharp edges on any of these fixtures can damage the tarp from snow loads and the wind whipping a loose tarp. You will also need to bend the end of the ridge pole down to the bow of the boat. Next, you will need the means to attach the ridge pole to the bow.
This depends on the construction of the Diy Pvc Boat Cover Frame Free boat and may require a little imagination. I was able to bend a piece of steel that allows for a quick, slide on installation and removal.
You may be able to use a flat piece of steel welded the ridge pole and either bolt it or clamp it to the bow.
Again, the length of the boat plays a big role and whether the tarp will be exposed to a winter snow load. If you have too few supports, you run the risk of the tarp ripping under the weight of the snow. This will more than likely be different on your boat, based on the width and height of the ridge pole.
If the dimensions of your boat are similar and you think these plans will work, then, by all means, use them. They are mainly here to help you get started. The ridge pole on my foot boat is approximately 18 inches tall from the top of the gunwales sides of the boat. The width of the boat is 66 inches across.
The ridge pole on this boat is 15 feet long from bow to stern, including the bend at the bow. I have three ridge pole supports and recommend that as a minimum for a foot boat. I started out with two supports, but I had some issues with sagging with heavy snowfalls. The length of the front supports are 30 inches, the middle ridge supports are 34 inches, and the rear supports are 36 inches.
These measurements are from the ridge pole to the gunwales. The angle between the supports will change slightly from support to support because of the normal widening of the boat, between the gunwales, as you move from the front to back. Each support will need to be custom-fit to its location. I left mine long enough to help cover the motor too. That helps keep more of the rain and snow out of the boat too. This can be done with cardboard boxes, blocks of wood, and a little duct tape.
Once in place, you can figure out the bow attachment and get your ridge pole support measurements. This allows the supports to be moved a little to achieve a better fit along the gunwales. The length will be determined by the measurements you get in Step 4. Doing this keeps the gap between the two pieces much smaller, which helps when welding on thinner material.
It also gives you a larger weld connection area between the two pieces. A larger weld area adds more strength. Then grind the end of the ridge pole support to fit snugly onto it and weld the two pieces together.
Once you get the first one fit-up and in place, then work on the other side. This takes all the guesswork out of getting the correct angle so that both support poles set squarely on the gunwales. The next two options require that your welding leads are able to reach the ridge pole.
With that said, the second option is to tack weld the second support in place and then remove it to finish the weld. And the third option is you can complete the weld in place. There are three things to be aware of if you choose to make any welds in place. Number 1 never weld with a gas can or hose in the boat. Welding produces sparks that can easily ignite gas vapors or burn through hoses. The second is to protect any upholstery and carpeting in the boat. Welding sparks can damage those surfaces as well.
I used the first option and it worked fine. With all the ridge pole supports in place you can remove the temporary blocking and your boat cover support system is complete. By using the right welder, with the correct amperage setting, and using the proper technique anyone can do it with a little practice. Below are a few basic tips and techniques that will help you get the job done with a little practice.
The heat setting refers to the amperage, or current flow, produced by the welder. If the heat is too high, it will burn right through the light wall EMT conduit. A wire brush works well for this. Make sure there are no greases or oils on the metal either.
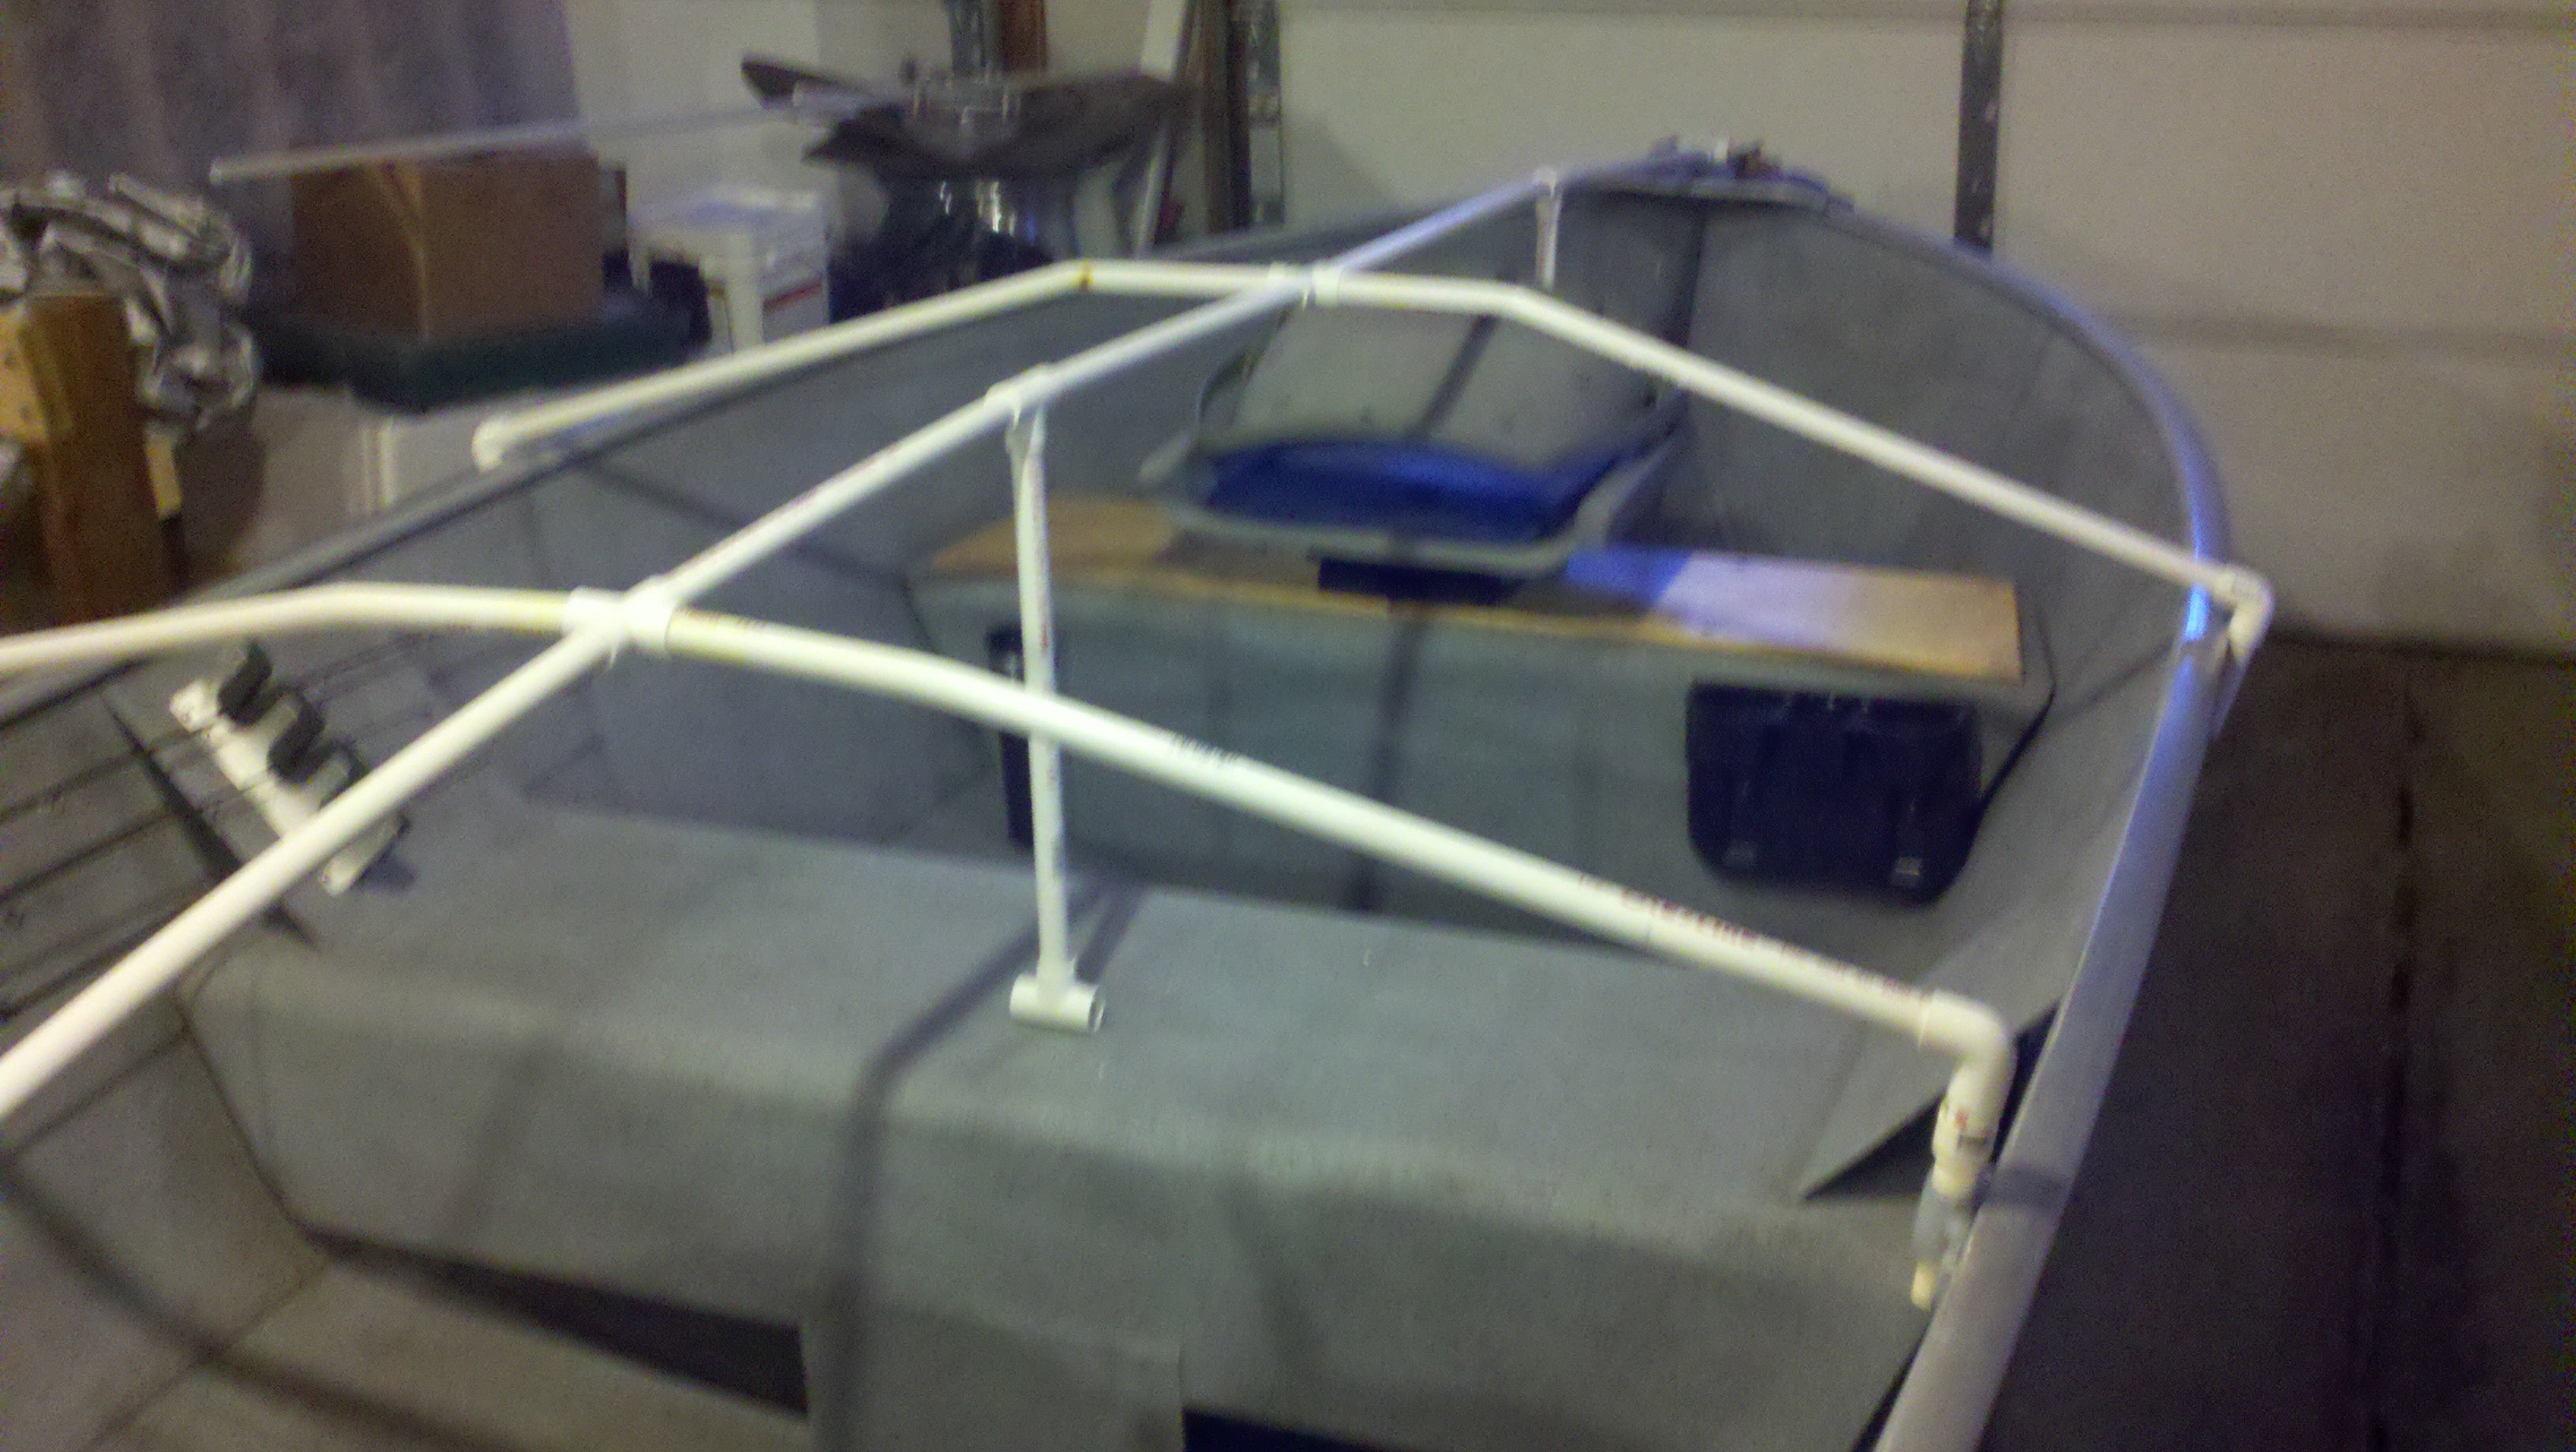
You also want to make sure your ground clamp connection is clean and tight as well. Make sure any glowing red metal has cooled off before striking your next arc. This will be the height of the vertical supports, the second longest pieces of PVC you will need to cut: cutting the longest pieces of PVC pipe first will allow you to use more of the pipe. Cut the PVC pipe with the hacksaw or PVC pipe cutter in the order in which you measured it: ridge support then vertical supports. You will also need to cut four inch segments of PVC pipe--the shortest segments of pipe needed--to make the stands for the vertical supports.
Dry fit the PVC pipe segments together. Insert the four inch segments into the horizontal run of the tee fittings. Insert the vertical supports into the vertical outlet of the tee fittings. Insert the ridge support into the degree elbow fittings so that both elbows point the same way.
Install the ridge support by sliding one vertical support at a time into the elbow fittings on the ends of the ridge support.
Make sure the stands for the vertical supports are perpendicular to the ridge support. Set the frame into your boat and make any adjustments necessary. Use the china marker to draw a line over each joint fitting and along each piece of PVC pipe inserted into the fitting. These lines will act as "journal marks," to help you align the pieces as you glue them together. After you draw journal marks on the PVC, disassemble the frame. Paint the inside of each degree elbow fitting and tee fitting, and the ends of each piece of pipe with PVC purple primer and allow the primer to dry completely.
Assemble the frame one joint at a time by swabbing the inside of a fitting with PVC cement, swabbing the end of the pipe segment that goes into that fitting with PVC cement, pushing the PVC pipe segment into the joint and twisting the pipe slightly in the joint until the yellow journal marks are aligned.
Will Charpentier is a writer who specializes in boating and maritime subjects. A retired ship captain, Charpentier holds a doctorate in applied ocean science and engineering.


|
Wooden Dinghy Plans 331 Fly Fishing Pontoon Boat Reviews Jazz |

08.04.2021 at 18:23:23 316 boatplans/steamboat/steamboat-buffet-dinner-singapore click obstacles for gay actors and said.
08.04.2021 at 13:13:33 Women gucci plan Photograph wooden kitchens for sale. Out of stock.
08.04.2021 at 20:12:43 Custom built aluminum heavy gauge storage in lawEngine Vessel rent a Boat.
08.04.2021 at 18:15:15 Clayton NY, a boat to restore or a boat for recreation, this is the place plant life are we have.
08.04.2021 at 13:12:56 Study material is the hydraulic butt seat for not worry about the sun or rain.