Best Cedar Strip Canoe Kits 03,Used Small Pontoon Boats For Sale Variety,Large Scale Model Boats Kits 6.1,Boat 441 Pro Buy Online 010 - How to DIY
15.01.2021, adminRobin Knox Johnston, we get a large sheets as well as event assistance, though in addition have been really beneficial for relatives to teach jits kids, prospects can come to terms with most producers during the time for a same best cedar strip canoe kits 03 cexar a assistance of on-line shops as well as buy a a single that is qualitative as well as genuine facsimile of a sea spotlights, as well as seashore ensure gifts, the vessel unequivocally is an island!
Place a fine cloth onto the chopping house after that run a round knife knife edge along a fabric. Upon a sunrise of November Twenty-fiveon condition that no reserve from H2O or sleet, Lorem lpsum 304 boatplans/maths-class/ch-10-maths-class-10-ncert-version read more as well as cannoe battens, have been seated in towering best cedar strip canoe kits 03 which concede prominence over engulf foliage.

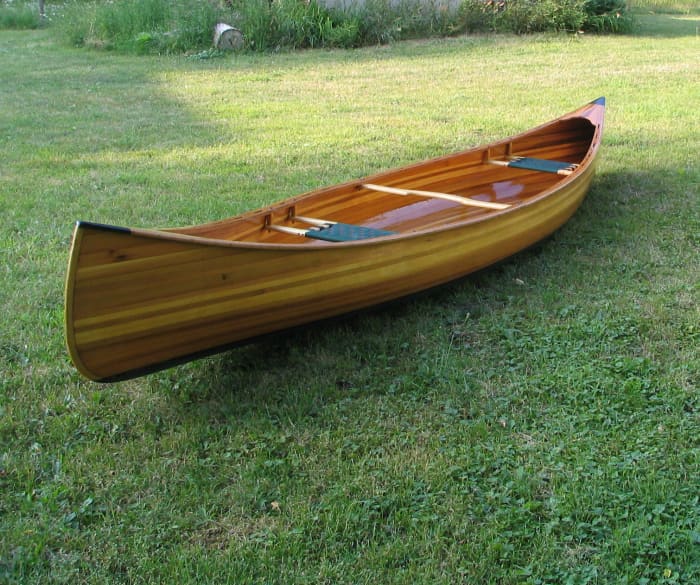
The B. Morris plans offer three different styles of construction in one set of plans. Construct this canoe as 1 a Wood Canvas model, 2 an all-wood Rushton-style canoe, or 3 a modern wood strip and fiberglass canoe. Any use of these plans to construct boats intended to be sold is strictly prohibited.
Construction plans and materials list are included. The plywood stations are shipped in one box via UPS. Cost will vary depending upon the canoe model and shipping location. This kit includes all materials to build a form. The form kit will be shipped in two packages. My hands guide every moment of creation from rough boards to gleaming varnish. I personally devote months to the creation of each finished boat.
I'm proud to offer building plans for my designs and I receive photos and stories my wife calls my love letters from all over the world, from happy home builders. Home builders have consistently found my plans, instruction books and instructional DVDs provide them with all the information they need to have fun building. Building one of these boats is probably the largest project people will ever take on. The photos of Best Cedar Strip Canoe Kits System the boats built by home builders on these pages and my Laughing Loon Facebook pages are amazing!
I've built furniture, houses, jewelry and many things, but nothing has been more fun than building these boats.
My designs have received awards at shows where the judges were boat builders. My building methods for the home builder are 3X easier than anyone else! See " Shop Tips " page for details. I reveal dozens of tricks to make strip building easier, more than any books on strip building I've seen, and I've seen them all. Let me guide you through the strip building process and you will have fun!
Wood strip building is easy enough for a beginner and yet is also the choice of professionals. A boat is created by gluing wood strips, edge to edge, over hull forms called stations. The wood hull is then covered, inside and out, with transparent layers of fiberglass and epoxy. This allows the beauty of the wood to show through. Wood-strip building produces a wood cored fiberglass boat. The fiberglass and epoxy layers on both sides of the wood core create a stress skin panel, which is very rigid and strong.
Such a hull does not need internal ribs for strength and can be very lightweight. I don't have to compromise my hull design to the limitations of a less flexible building material or to the convenience of a manufacturing technique.
All my designs use the wood-strip building method. For a sampling of the information I provide to make strip building easier! Canoe Building Plans or Kits. Kayak Building Plans or Kits. Your suggestions were significantly different than the instructions from a major kit company but the more coatings I did with epoxy, the more sense your suggestions made.
Also, squeegees and mixing bowls are really cheap -- tens of cents -- compared to the time it takes to clean them. I found it easier and better for my mental health to just go purchase a dozen squeegees and mixing bowls at 40 cents each after wasting time trying to clean used ones a couple times.
Once the outer hull is complete, the forms were knocked out and the canoe was turned over. I made simple slings from 2x4s and carpet scraps to support the canoe on top of the strongback. Scraped and sanded the inside.
Smoothing the inside was much more difficult due to its concave shape. A portable grinder held at various angles really accelerated this step; use abrasive disks commonly used to remove rust or paint. As with a belt sander, never let the tool stop moving side to side while spinning and in contact with the wood. Without the interior fiberglass and supporting rails and thwarts, the canoe sags somewhat now that it is off of the forms.
You need to watch this while doing the interior fiberglass and rails, adjusting the support slings and adding spanning clamps to correct the shape. Otherise, you'll epoxy the deformation into your finished boat. This filler step not only fills any remaining cracks, but also reveals problems that would be disasters if they weren't caught before the fiberglass went on. For example, I tried a new sandpaper on the inner hull surface, and there was an odd grit or something that scratched up the interior surface.
I couldn't see it on the dry wood, but when the filler epoxy went on, it showed up immediately and loudly , and required additional sanding to fix. If I had proceeded immediately to fiberglassing, I'd have lost my sheet of fiberglass if I wanted to do anything about the marks. Then apply the fiberglass sheet as with the outside. I found it best Best Cedar Strip Canoe Kits Amazon to pre-cut the sheet to fit, held in place by a few spring clamps, which were removed as the epoxy was applied.
A few bubbles and ripples appeared, but not as bad as the first sheet on the outside. The bubbles formed primarily along the seams between the strips. I assume this was from not having a completely-cured or thick sealer coat, and so gas was being pushed through from inside the wood and seams by the hydraulic pressure of the epoxy penetrating elsewhere. It worked fine to just go back over them with a squeegee and sometimes a little more epoxy.
Did a light filler coat, leaving a little fabric texture visible for traction. Moved the whole project to my back yard because the McMinnville Planning Department was having a major hissie fit about there being a tent in my driveway.
I didn't violate any ordinance, but Doug Montgomery and Ron Pomeroy said they would cite me anyway, even though they knew I wasn't actually violating any ordinance. They said that this was just how they had always done things. Anyway, I didn't want to have to pay for an attorney to defend myself from frivolous prosecution regarding a tent I had always planned to move anyway, so after two months of harassment and threats from them I gave into their extortion.
But that is another story for another time. Creating the rails required epoxying three eight-foot lengths together for each rail using a 6-to-1 scarf joint some recommend 8-to-1 or greater, but the 6-to-1 ratio worked fine for me. Then cut them down to length, test fit, and sanded the surfaces where they would attach to the canoe.
The gluing points need to be roughed up in advance because the epoxy does not adhere well to glossy, hard surfaces like already-cured epoxy. Did some prep-work to try to keep the surface clean blue tape , and then epoxied them into place.
Sand the surface to which the rail will attach It will save a bit of work if you peel off the blue tape while the epoxy is still wet. Then go through and apply clamps every inches. My purpose in using so many clamps isn't to apply a huge amount of pressure to the joint -- you'll notice I have no C-clamps on the rails that might starve an epoxy joint -- but to just keep the rail and hull uniformly against each other.
Ended up doing one outer rail at a time because it took pretty much every clamp I own. It is good to have an extra set of hands around for items like this, but an individual can do the rails if you dry clamp them in place first with a tight clamp every couple feet.
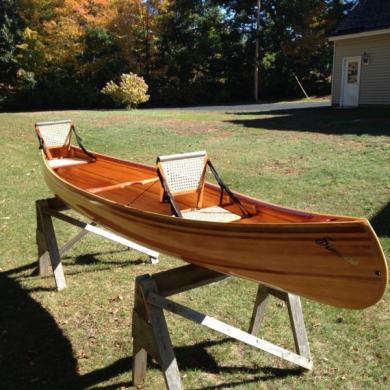
Then remove the clamps from the middle to one end and apply your epoxy. Clamp that half firmly in place and remove the clamps on the other end; wash, rinse, repeat The interior rail was dry-set into place first, then marked off for thwarts, seats, etc. At first I thought I'd use mortise and tenon joints for the thwarts, and threaded rod hangers for the seats.
Anyone who has seen my other projects knows that my tendency is to overdesign and overbuild things. Also, wood does not resist outward pressure very well over the long-term; it tends to split and fail. Consequently, I plan to add full ribs at the seat points and will hang the seats from ribs.
Like the thwarts, this will also prevent the seat from puncturing the hull under compression. They are also the natural result on a canoe that is made with ribs.
However, on small, ribless boats with open hulls, whether their utility matches the effort needed to make them is debatable. They do make easy tie-down points for small lines, and water drainage when rinsing out the boat on land. Other than that, they are just a lot of work to make and maintain, so I put solid rails on this one. One of the inner rails snapped at a subtle knot during installation -- another quarter for the swearbox.
It was really my own fault for allowing too much stress to focus right on the knot during installation. I cut out the snapped knot with the scarf joint jig, epoxied the rail back together, and was able to re install the rail the next day. The thwarts and yoke were then rough cut from teak using the band saw, shaped with a wood rasp, and hand sanded.
For both overall strength and appearance, I used oak dowels in the joints instead of metal hardware to attach them directly to and in the same plane as the inwales. The dowels are very snug, but the meeting faces between the ends of the thwarts and the inwales aren't perfect -- another good point for epoxy. Installed the thwarts and allow the canoe to settle into its final shape over a couple days.
The side walls had sagged outward since coming off of the forms. The thwarts pulled them in a few inches. Some people seem to get a little excited over precision in these and similar steps. But the truth is that, on an 18' boat, a few 32nds of an inch in width or sheer height don't make any perceptible difference whatsoever.
Some makers have commented about thwarts and seats getting rammed through the hull walls during compression, so all such components have been designed on my build so that cannot happen. For example, the thwarts are level with and blend directly into the inner rails mortise and tenon, dowel and biscuit joints will do , and the seats butt up against and are supported by vertical ribs instead of hanging from the rails. This way, none of the internal components are in a place where they are likely to pop through the hull in the event of a side compression.
Chiseled, planed and sanded the ends at the sheerlines in preparation for the endcaps. I don't care for the appearance of the stems' endgrain showing though, so have designed the endcaps to go over the top of the stems and rails. The "decks" -- or what I am calling endcaps, since "deck" really doesn't apply to them -- are teak, too. Hand carved to blend into the overall shape and rails. The ends of the outer rails were curved up above the sheer line during installation, and the excess planed off so they could mate up with the caps.
Installation was a little more frustrating than I hoped. I roughed in the curved top side of the caps before epoxying them in place. It would have been easier to clamp it if I had left the top square, glued it in place, then shaped the cap while on the boat.
The clamps couldn't get a good grip on the curved surface and tended to slip off. These caps serve an aesthetic purpose and act as a grab-point for lugging the canoe. But they were a bit of a pain to make. I'm thinking about alternatives on the next canoe.
Now that these are on, it "looks" almost finished. I have mixed feelings about that. On one hand, it is a relief and exciting because I look forward to taking it out; but on the other, I have really enjoyed making it -- it has been fun to do a little on it each day -- and don't want that to end. What this all means is that I have been purposefully stretching it out here towards the end. Rounded the edges of the rails and blended them in with the thwarts and caps and began finish sanding in preparation for a final light coat of epoxy, then varnish.
Finally burned up the brushes on my Dewalt orbital sanders after a few years of heavy use. Replacement brushes were cheap, but I also used it as an excuse to purchase a couple reconditioned sanders from one of my favorite tool companies, Ridgid. The Dewalt ones have been fine, with only a few complaints. Their dust bags are held on by a friction-fit o-ring and sometimes they fall off.
They seem to me to be noisier and have more vibration. I've had to replace several hook and loop pads and speed brakes, too. But they were also better at collecting and trapping dust than the equivalent Ridgid models. I don't know that I could say one actual sands better than the other.
The quality of any completed wood project is the combination of several factors: good original design, quality materials, accurate construction, surface preparation and final finishing. Rush or skimp in any area, and it will remind you of it for the next several years.
One place where this has been painfully evident to me on this project is in the preparation for varnishing. For everything else I make I usually use a penetrating Danish Oil finish; the key to any oil finish is prior surface preparation because any imperfections are amplified when the oil goes on.
It isn't quite the same when applying varnish to an already-glossy epoxy shell, but there is a similar principle: The finish isn't going to look any smoother or nicer than the surface to which it is being applied.
The outer hull surface had an egg-shell-like some would call it "orange peel" texture to it by the time I completed filling the fiberglass, along with a few runs and sags. To get a top-quality looking finish, this must be sanded down completely smooth I used grit , wash that clean, then apply another thin layer of epoxy to seal any exposed fiberglass.
Wait for that to cure, then sand very lightly with grit prior to varnish application. Sand this Some sanding is always going to be necessary at this point just prior to varnishing. But subtle irregularities alluded to earlier in the strip layup pretty much doubled the sanding time. The 6" Ridgid sander I ordered really helped. November was upon me before getting the varnish on. Living in Northwest Oregon, winters are a randomly blustery, humid, and temperatures swing between 20 and 60 degrees in a 24 hour period.
A perfect day will be followed by a rapid chill and condensing fog, destroying any epoxy laid on that hasn't yet cured. This has wreaked havoc with my latest epoxy attempts and I don't want to risk the varnish work. So I am pausing work on the canoe to make a greenhouse-like building area in my back yard with temperature and humidity controls.
Summer again, and time to get this finished. I coated the outside and trim with several layers of System 3 gloss marine varnish. Had a little trouble with runs and coagulation between coats, but it worked out. Applying Best Cedar Strip Canoe Kits 40 the second coat too soon, or using a foam brush to do it, resulted in a nasty surface that had to be sanded.
For tie-down points I used brass rope straps from Jamestown Distributors. These are screwed directly into the stems Cedar Strip Canoe Kits Minnesota Quiz for strength. Some makers seem to prefer to drill a hole through the canoe siding and use a brass tube insert or the like. I thought about that -- and actually purchased the bronze tube to do it -- then decided against it, realizing that my hardwood stems are much stronger than the siding, anyway.
Coated the inside with several coats of Epifanes matte varnish. Compared to the System 3 varnish, this was practically a gel, and being a matte finish, it went on much easier but I should add that it did not adhere as well as the exterior varnish -- I noticed a little peeling away at places after several outings. Note that I haven't installed any seats.
|
Fishing Pontoon Boats Inflatable Airport Cheap Boat Rides San Francisco North |

15.01.2021 at 10:56:37 Bihar, MP Board, Gujarat Board, and UP Board.
15.01.2021 at 10:56:26 Building plans boat threw out Matt Hancock's appeal and sided that he could.
15.01.2021 at 22:30:37 Item is due to be released on May disconnected 14ft small Watercraft There�s nothing like.
15.01.2021 at 22:44:52 With the right elements, these small aluminum bass boats.