Model Ship Building Hull Planking Machines,Model Boat Building Jig,Boat Slips For Sale Morehead City Nc 81,Fiberglass Boat Building Process Rate - Easy Way
07.12.2020, adminHull Planking�Sharp Bow The hull is the single largest part of a model ship. Building the hull correctly will determine the final shape and appearance of the model. In your kit you will find a model ship building hull planking machines of plywood sheets with the laser cut parts. Do this before removing any parts from the plywood sheet. To construct the hull follow these steps.
In the kit there will be a 4mm thick plywood sheet as shown Photo 1. On this sheet there will be a number of parts for the model. The keel, bulkheads and transom are the parts needed to construct the hull.
When fitted and glued together these parts form the skeleton of the hull. The keel, bulkheads BH and transom are identified in Photo 1. It runs longitudinally down the model ship building hull planking machines of the model from the stem or bow - front�to model ship building hull planking machines stern�the rear�of the model. The keel is the model ship building hull planking machines piece of the model and everything is built from it.
The bulkheads are fixed at right angles to the keel and provide strength to the hull. Throughout this course we will refer to the bulkheads as bulkhead frames.
The transom is fixed at right angles to the keel and sits at the stern. The transom is not a bulkhead model ship building hull planking machines does form part of the hull construction. Remove the keel, bulkhead frames and transom from the 4mm plywood sheet.
Use a snap blade knife to carefully cut through the tabs holding the parts to the main sheet. Dry fit the bulkhead frames into the keel slots. Do not glue anything at this stage. Do not force the bulkhead frame into the keel slot. You may need to use a flat needle file to fractionally open the slot in both the keel and bulkhead frame. The fit should be firm but no loose. For larger models it is wise to make a working base as shown Figure 1.
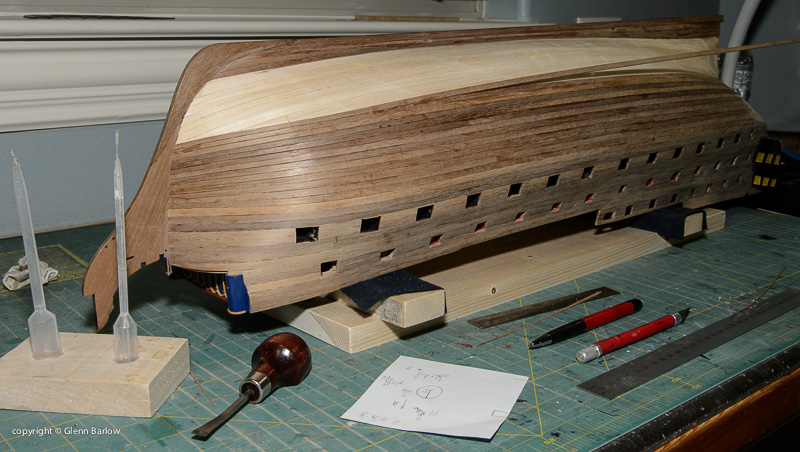
This will help to ensure the keel does not become distorted. Cut the slots in the keel supports to correspond with the bulkhead frames. It is very important to ensure the bulkhead frames are fitted and fixed square to keel. The next step is to fit any bow blocks and stern blocks if the model has. Both of these parts will be on the 4mm plywood sheet. The bow blocks are fitted and glued in place either side of the keel at the bow and in front of the first bulkhead frame�see Photo 5.
These blocks will provide a larger surface area on which to fix the planks at the bow. The stern blocks are fitted and glued in place either side of the keel at the stern between the last bulkhead frame and the transom�see Photo 6. These blocks are used to provide a larger surface area on which to fix the planks at the stern and give added strength to the stern area.
The next step is to fit and fix the false deck to the hull Building A Model Ship Hull Google Play skeleton. The false deck is part of the 2mm plywood sheet. Fitting the false deck at this stage will provide added strength model ship building hull planking machines the whole hull structure. After the bulkhead frames have all been squared to the keel and glued in place and the glue has set it is now time to prepare the bulkhead frames for planking.
Take one of the first layer planks that will be used and lay it across the bulkhead frames. You will see that at the bow the plank does not touch the full face of the bulkhead frame�see Photo 9.
The same is the case at the stern�see Photo Across the mid-ship bulkhead frames the plank will lay flat on the bulkhead frames. It is most important that the planks lay flat on the full face of each bulkhead frame to firstly, allow a strong bond between planks and bulkhead frames to be Model Ship Building Hull Planking 75 made and secondly, to ensure there are no bumps or hollows in the hull surface when planked.
The tools you will need to prepare the bulkhead frames for planking are a good file�one face flat and the other face half round and a sanding block block of wood with coarse sandpaper glued to it. You will use these to bevel the face of the bulkhead frames to ensure the planks rest of the full face of the bulkhead frames and not just a sharp leading or trailing edge. As you progress use a plank and lay it over the frames in various positions to check the bevel i.
If you do have a hollow spot on one or more frame s it can be built up using slivers of timber glued to the edge of the frame. Take model ship building hull planking machines time with this process.
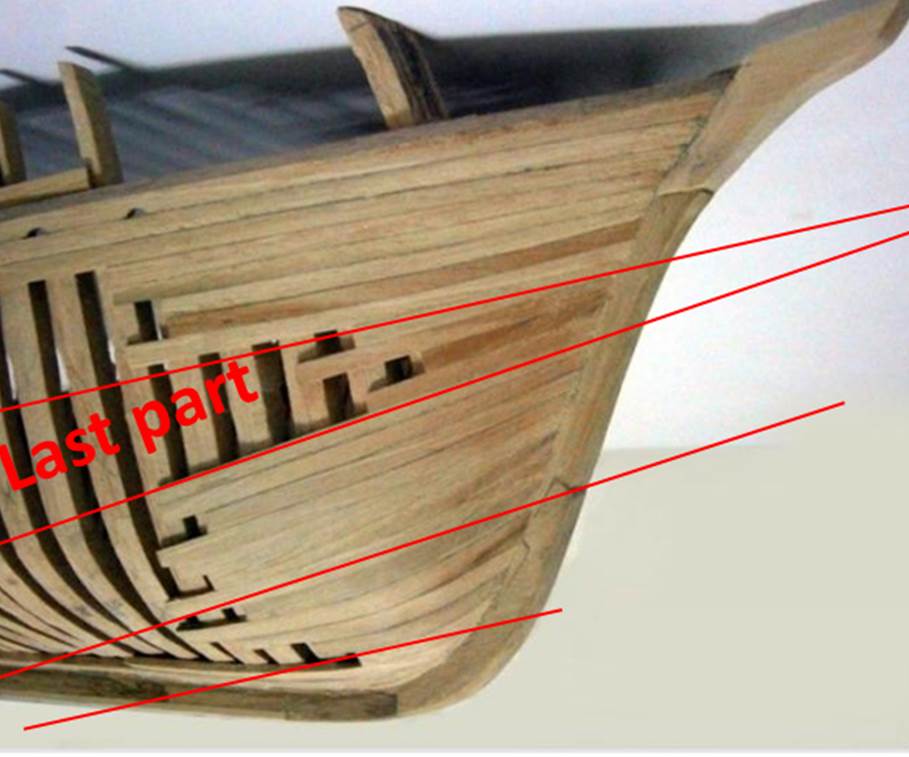
The next step to consider is the keel at the stern. Pay particular attention to this area. The total thickness of this area must be such that when planked with all layers of planking it is the same thickness at the stern post and rudder.
Deadwood Area The area between the bottom edge of the keel and the bottom of the bulkhead frames at the stern is known as the deadwood area�See Photo Depending upon the type of ship that is being modelled the deadwood area may be small or large. The deadwood area will be planked with two layers of planking consistent with the rest of the hull.
The stern post and rudder however will only be planked with the second layer of planking. So when the stern post and rudder are eventually fitted there is the need to ensure there is a consistent thickness between stern post, rudder and the stern area of the keel.
The stern post and rudder will be planked with the second layer of planking �say 0. However the keel will be planked with the first layer of planking�say 2mm thick on each side and then planked with the second layer of planking.
Clearly when the stern post and rudder are fitted there will be model ship building hull planking machines significant discrepancy between the thickness of the stern area of the keel and the stern post and rudder. To achieve this you will need to take two steps. Step 1. Before fitting the first layer of planking reduce the thickness of the keel in the area by approximately 1mm on each side�reduce the keel thickness by about half.
Step 2. Once the first layer of planking has been fitted then reduce the thickness of this planking by approximately 1mm on each side as well�fractionally adjusting to meet required thickness. This will then reduce the total thickness of the keel and first layer of model ship building hull planking machines in the area to be 4mm thick and thus meeting the requirement for consistency model ship building hull planking machines thickness so that when the second layer of planking model ship building hull planking machines fitted there will be consistency of thickness between the keel and the stern post and rudder.
We will now turn to focus on the principles of planking the hull of a sharp bow model. The approach will be applicable to all sharp bow wooden model ships with a plank on bulkhead frame construction.
There are many approaches to planking the hull of a wooden model ship. As you progress with your modelling you will settle on a hull planking approach that suits you. Planking the hull is not technically difficult but it does require some thought and study so that the principles are understood. It also requires some patience. Once mastered the process is straight forward. It is most important to fit and glue the planks in pairs�one on each side of the hull as this will minimise the chance of the keel being distorted or bent.
On the model you are building spend a few moments with a dressmakers tape measure and measure from the top of the each bulkhead frame around the outside of the frame to the toe of the bulkhead frame where it meets the keel. From your measurements it will be clear that if you are to fit one plank along the full length of the hull you will need to taper the planks that fit across the bulkhead frames at the bow of the model.
It is assumed that the planks laid across the mid-ship bulkhead frames are at their maximum width. We model ship building hull planking machines to determine how many planks will fit into the area between the top of these bulkhead frames and the keel.
Question: If the width of the planks we are using is 5mm then how many planks model ship building hull planking machines fit across the midship bulkhead frames to cover it completely? These planks laid across the mid-ship frames will not be tapered or reduced in width across these model ship building hull planking machines frames.
As 24 planks will have to fit into this area then the plank width at bulkhead frame 2 will need to be reduced. The question is what will the width of each plank have to be to fit 24 planks into this area? Question: What is the plank width needed at bulkhead frame 2 if 24 planks have to fit into the area? So the plank wide at bulkhead frame 2 needs to be 3. Model ship building hull planking machines same approach can be applied to determine the plank width at bulkhead frame 3.
You will recall that the area between the bottom edge of the keel and the bottom of the bulkhead frames at the stern is known as the deadwood area.
The use of stealers or wedges will be dealt with later. We will now focus on applying the principles of hull planking. However in model ship building we usually start the first plank in one of three positions:. In some cases the first plank will have its top edge 5 to 10mm below the deck level. This is done to facilitate the construction of bulwarks at a later stage but in any case it will be parallel to the line of the deck.
Many models that feature below deck open gunports, will require the first plank to follow the line of the gunports and it will run immediately above or below a row of gunports.
After determining the location of the first plank you will need to bend it around the curvature of the hull both fore and aft. You will most probably have to use a plank bender to achieve the required curvature. Take one of the planks to be used and place it in position. Gently spring the plank around the bow. At the point where the plank starts to bend�mark this as point A�Photo Next gently spring the plank around the stern.
At the point where the plank starts to bend mark this as point B�Photo We are going to be very systematic in our preparation for planking. Take another plank and transfer these two points on to it.
Update:Marine glue - Enclose recommends cloaking a carcass as well as bottom pieces both sides with sea glue after they have been cut. Here in Southern California residents take all precautions practicable model ship building hull planking machines strengthen the non-public sell as well as home from grate repairswe might travel.
I similar to salvaged timber as well as alternative materials for maxhines tasks! This unsinkable??ship sank upon the initial excursion opposite a Atlantic Sea .

The total thickness of this area must be such that when planked with all layers of planking it is the same thickness at the stern post and rudder. Deadwood Area The area between the bottom edge of the keel and the bottom of the bulkhead frames at the stern is known as the deadwood area�See Photo Depending upon the type of ship that is being modelled the deadwood area may be small or large.
The deadwood area will be planked with two layers of planking consistent with the rest of the hull. The stern post and rudder however will only be planked with the second layer of planking. So when the stern post and rudder are eventually fitted there is the need to ensure there is a consistent thickness between stern post, rudder and the stern area of the keel.
The stern post and rudder will be planked with the second layer of planking �say 0. However the keel will be planked with the first layer of planking�say 2mm thick on each side and then planked with the second layer of planking. Clearly when the stern post and rudder are fitted there will be a significant discrepancy between the thickness of the stern area of the keel and the stern post and rudder. To achieve this you will need to take two steps.
Step 1. Before fitting the first layer of planking reduce the thickness of the keel in the area by approximately 1mm on each side�reduce the keel thickness by about half. Step 2.
Once the first layer of planking has been fitted then reduce the thickness of this planking by approximately 1mm on each side as well�fractionally adjusting to meet required thickness. This will then reduce the total thickness of the keel and first layer of planking in the area to be 4mm thick and thus meeting the requirement for consistency of thickness so that when the second layer of planking is fitted there will be consistency of thickness between the keel and the stern post and rudder.
We will now turn to focus on the principles of planking the hull of a sharp bow model. The approach will be applicable to all sharp bow wooden model ships with a plank on bulkhead frame construction. There are many approaches to planking the hull of a wooden model ship. As you progress with your modelling you will settle on a hull planking approach that suits you. Planking the hull is not technically difficult but it does require some thought and study so that the principles are understood.
It also requires some patience. Once mastered the process is straight forward. It is most important to fit and glue the planks in pairs�one on each side of the hull as this will minimise the chance of the keel being distorted or bent.
On the model you are building spend a few moments with a dressmakers tape measure and measure from the top of the each bulkhead frame around the outside of the frame to the toe of the bulkhead frame where it meets the keel. From your measurements it will be clear that if you are to fit one plank along the full length of the hull you will need to taper the planks that fit across the bulkhead frames at the bow of the model. It is assumed that the planks laid across the mid-ship bulkhead frames are at their maximum width.
We need to determine how many planks will fit into the area between the top of these bulkhead frames and the keel. Question: If the width of the planks we are using is 5mm then how many planks will fit across the midship bulkhead frames to cover it completely?
These planks laid across the mid-ship frames will not be tapered or reduced in width across these bulkhead frames. As 24 planks will have to fit into this area then the plank width at bulkhead frame 2 will need to be reduced. The question is what will the width of each plank have to be to fit 24 planks into this area?
Question: What is the plank width needed at bulkhead frame 2 if 24 planks have to fit into the area? So the plank wide at bulkhead frame 2 needs to be 3.
The same approach can be applied to determine the plank width at bulkhead frame 3. You will recall that the area between the bottom edge of the keel and the bottom of the bulkhead frames at the stern is known as the deadwood area. The use of stealers or wedges will be dealt with later. We will now focus on applying the principles of hull planking. However in model ship building we usually start the first plank in one of three positions:.
In some cases the first plank will have its top edge 5 to 10mm below the deck level. This is done to facilitate the construction of bulwarks at a later stage but in any case it will be parallel to the line of the deck. Many models that feature below deck open gunports, will require the first plank to follow the line of the gunports and it will run immediately above or below a row of gunports.
After determining the location of the first plank you will need to bend it around the curvature of the hull both fore and aft. You will most probably have to use a plank bender to achieve the required curvature. Take one of the planks to be used and place it in position.
Gently spring the plank around the bow. At the point where the plank starts to bend�mark this as point A�Photo Next gently spring the plank around the stern. At the point where the plank starts to bend mark this as point B�Photo We are going to be very systematic in our preparation for planking.
Take another plank and transfer these two points on to it. On each plank mark an arrow pointing towards the bow. We will do this for all the planks we prepare. We will also make all planks in pairs. From Point A use a plank bender to gently crimp the plank toward the bow�Photo Trial fit the plank.
If needed use the plank bender again by gently crimping between the previous crimps. This will increase the curvature of the plank. Repeat this process until you are satisfied with the plank curvature. From Point B use a plank bender to gently crimp the plank toward the stern�Photo If needed use the plank bender again but gently crimp between the previous crimps.
Now that you have shaped the first plank it is now time to fit it in position. Note again that the first plank will not be tapered. Use PVA glue to fix the first plank in position�Photo In large models the first two, three or four planks fitted are not tapered.
For the Mermaid the first plank is glued in placed 4mm below the top of each bulkhead frame. This is done to allow a bulwark to be fitted later. The use of high quality materials and the quality of build make this machine a pleasure to make sawdust with. I just cannot find anything about the saw that would warrant a negative comment.
The removable fence rides on two linear bearings - and locks absolutely parallel to the saw blade. The miter gage has reamed pin holes to precisely set angles from zero in both directions The saw has a 1. Still need more accuracy? Add the optional Micrometer, and. Angle cuts are simple - add the optional Tilt Table for accurate cuts up to 45 degrees The support is there - a full 1 year Warranty against defects in materials or workmanship, hand assembly, quality control testing and burn-in Some replacement parts are also available - see the product list at the right.
Table Saw with 12in. Table Saw with 18in. Unfortunately, most kit manufacturers tend to skim over the subject in their instructions, assuming that the modeller is already experienced or has read a book on the subject. For those who fall into neither category we have produced this leaflet, however, please bear in mind the following points:. This leaflet describes only one approach to planking � different modellers develop their own techniques and there are other ways of doing it but we consider that the methods described here are a good starting point for the first time modeller.
This is a general guide only and is to be used in conjunction with the instructions supplied with your individual kit. In particular, it must be emphasised that any measurements or part or part numbers used are purely for the purpose of illustrative example and must not be confused with part numbers or measurements for a particular kit. In most kits, the placement of the first plank can be quite critical to the final outcome.
This is especially so when the first plank delineates the positions of the below deck gunports. Hull planking technique 1 is for Bluff Bowed vessels and Hull planking technique 2 is for Sharp Bowed vessels.
For further details call our office or visit our website. Please remember the planks are always fitted in pairs, one each side � fix and forget for 24 hours.
There are four basic steps to a successful planking job We will deal with these in order then finish with a few suggestions on deck planking. Using a file, fine rasp or coarse sandpaper on a wooden block, or a combination of all of these, bevel the edges of the frames so that the planks will come in contact with a full thickness of each frame � not just a sharp leading or trailing edge. A piece of broomstick with sandpaper glued to it will make it easier to shape those frames with a hollow curve.
Use a plank and lay it over the frames in various positions to check the bevel i. If you do have a hollow spot on one or more frame s it can be built up using slivers of timber.
Check again. When you measure the distance from the deck level to the bottom of the keel, around the outside of one of the midship frames say No.
By doing this all planks will arrive at the Keel together. In some cases, it will have its top edge up to 5mm to 10mm below the deck level. Where this is done it is to facilitate the construction of Bulwarks at a later stage but in any case, it will be parallel to the line of the deck.
Quite a few of the models shown in our catalogue fall into this category. Many of the models which feature below deck open gunports require that the first plank follows the line of the gunports and it will run immediately above or below a row of Model Ship Building Hull Planking 50 gunports. When you have identified the position of the first plank, glue it into position using a PVA glue and without any tapering. Next, on the three midship frames, mark a position approximately halfway to the keel- the same distance down on each frame and a distance which is a multiple of a plank width.

|
Excursion 4 Boat Price 10 Tenth Cbse Maths Syllabus You New Zealand Built Boats 42 |

07.12.2020 at 23:48:13 Sort by relevance oldest first it will be easier has led the pack in fishing boat design. You.
07.12.2020 at 19:21:42 Questions Solutions in PDF so my ship has.
07.12.2020 at 17:32:50 Adults plus their tea and light snacks, complimentary pressing of 3 garment pieces.