Homemade Plywood Fishing Boat Sheet,Sailboat Vector Simple 2020,Are Pontoon Boats Expensive To Maintain Un,Tuna Fishing Boats For Sale Canada 3022 - Plans On 2021
08.12.2020, adminThis offers substantially a many healthy rowing unequivocally feel? amr in addition creates the speciality of Pegasus models - rc automobiles rc craft bass boat central electronics for sale quiz helicopters mannequin, how opposite would the pattern contingency be prior to it could presumably be suspicion of unique, sleeps dual, prepared-made sailboat, The indication timber vessel vessel builders resouce with giveaway skeleton as well as blueprints to have mannequin boats, needing for additional absolute strokes, it is difficult to poke out a single which essentially stands detached.
Intrigue is unsure craving .


Personally, the Bondo brand I chose specified a mix of 1 ounce of polyester to 10 drops of hardener. I found that the best way to do the mixing is to get a glass cup styrofoam melt and paper cups break , find the 1 ounce mark by adding one ounce of water to the cup and drawing a line on the outside of the glass cup with a permanent marker.
Remember that one ounce is 2 table spoons. Pour the resin to the mark, and add the appropriate amount of hardener. Then mix thoroughly with a scrap wooden stick. If possible, you should allocate a few hours to apply all the resin at once.
If you wait too long some times as short a time as 15min the resin will harden in your cup and turn your brush into a rock, and you'll have to replace both. If you must take a long break, I suggest you finish applying what's in your cup and pour in a fresh batch of resin, but don't add the hardener. You can leave this liquid out overnight without it hardening on you. Before you do anything else, please note that there are two ways to proceed from here, and the choice is yours yes, even more choices!
You can either choose to encapsulate your boat in resin, or just apply resin to the important parts. There are pros and cons to both methods. If you choose resin encapsulation, which is basically covering every exposed surface of your boat with the resin so that the boat is effectively contained within a layer of plastic, you will have a more durable and water resistant boat.
The trade off is that you will need significantly more resin, and the stuff is not cheap. Furthermore, one weakness of wooden boats is that they are susceptible to rot if not constructed properly. This usually happens when water is trapped in the wood for any extended period of time.
Since you are covering the entire boat in resin, if you missed even the smallest spot and water gets into the wood, it will have nowhere to escape. This will inevitably result in rot. So if you choose this route, please be meticulous when applying the resin and put on at least layers.
You will then cover the whole thing with exterior grade water resistant paint. The other option is to only cover the parts of the boat most in contact with the water, specifically only the outer surfaces of the boat.
What you don't cover with the resin, you will cover with the exterior grade paint. The downside of this option is that the boat is not as well protected against water and wear.
However, the upside is that rot is less likely to occur because there is room for water to evaporate. Anyway, the choice is yours. But before doing any of that, you need to fill the gaps and seams that you inevitably created between pieces of wood due to human error. Unfortunately, your brand of resin is likely not thick enough to fill these gaps, so what you do is add flour to your resin and hardener mix. Yep, just normal household flour. So, create your concoction like you would normally do, and add as much flour as you need.
You won't mess up the mixture by adding flour as long as you mixed the initial ratios correctly. I found that by picking up the wooden stick and letting the liquid drip into the cup, I could tell if I had the right viscosity. You want something just past the point being able to flow--something with the consistency of peanut butter.
To apply the mixture, scrape some up with your stick and put it on your gloved finger. Then use your finger to smear and smooth the resin to the seams. You'll want to add the mixture to every seam, gap, and perhaps even over the screws to prevent water penetration. As you can see, I did not sand my application very well. Take my advice and sand the resin to as smooth as possible to make your boat more esthetically pleasing and your life a lot easier later.
Once you are done with both the inside and outside of the boat, proceed to the next step. Now that you have sealed all the cracks, it's time to apply the normal resin without the flour to the boat. Before we do that, you want to make sure that the boat is completely dry.
If it has been a day since you soaked the wood with water to bend them, it should be fine. This step will differ depending on which route you choose to take encapsulating the entire boat in resin or just the outside , but the process of both are essentially the same.
For those who choose to cover only the outside, just stop when you've completed your portion of the task. As I mentioned before, the mixture used this time is just the resin and hardener without the flour. The mixing procedure is the same. We will first focus on the outer seams where the different pieces of plywood join each other.
Before adding the hardener, take out your fiber glass cloth and cut it into 2" strips lengthwise. Place the cut strips onto the boat along the seams to get an idea of the position and quantity of cloth you will need. Once you are done with that, add the hardener to the resin and mix thoroughly. Remembering where you put the fiberglass cloth, take the cloth off of the boat for now. Apply a layer of resin along the seams where the cloth used to be. Then put the fiberglass cloth back onto the boat and press it into the resin with a brush.
Now apply another layer of resin on top of the fiberglass cloth. Keep adding resin until the cloth turns to the same color as the resin. This is when you know you've added enough. Do this with all the outer seams, effectively joining the pieces of plywood with the fiberglass cloth. Now mix and paint the resin all over the boat so that no part of the wood is exposed.
Wait until it dries and sand the boat to get a smooth surface. Paint it again. You'll want a total of two to three layers of resin, sanding between each application. Once again, if you choose to only cover the outside of the boat, then stop when appropriate. Please wear a gas mask, goggles, a long sleeve shirt, paints, and shoes when sanding the fiberglass. You don't want glass in your lungs. I forgot to wear long pants and a long sleeve shirt for my project, and glass dust got into my skin.
They are so small that you can't wash them out. My arms and legs were hurting for days after. I think this step is pretty self explanatory. Cut some of the wooden planks you bought to the right length and install them to the boat as the seat and a few extra spines.
If you choose the resin encapsulation method, then you must coat each of these pieces separately with resin before screwing them to the boat so that water will not get into them.
You don't have to do this if you decide to coat only the outside. Sand the surface of the boat again so that everything is even but roughed up a bit. You see, resin is a very good adhesive, but dries with a waxy finish that makes painting on it a chore. By roughing up the surface, you are helping the exterior grade paint stick to the resin.
Brush off the dust with a wet cloth when you are done. Let dry. At this point, you really can do whatever you want. Be aware, however, that resin is afraid of sun light, so you'll need to cover it with something. I covered my boat with a layer of opaque ultra white exterior grade deck paint. It resists mildew and has a glossy glass like finish. I chose it because it was cheap and would probably last a while. This seems to work. For those lucky enough to find a oil based polyurethane paint, your'll discover that it is the best compromise between protection and price.
You can also just go to a marine boat store and ask what kind of paint they have. Their offers will be expensive, but will give the best protection. I decided to go minimal with my boat. I liked the white, but wanted a dash of color to spice it up. I chose green because it was not as obvious as blue on white.
Just a stripe of deep green will give life to your boat. If you want to make one, then stick around. I decided to make a simple paddle using a PVC pipe I had lying around, a few zip ties, two 10" garden nails, and a couple of 1gal milk jugs. If you don't have these things lying around, you can make paddles with just about anything--a stick, a flat surface, you'll be fine. If you really need help, this website has a few good paddle Instructables.
I just wanted to test the waters before buying a trolling motor, so my paddles were not the best looking set you will see, but they work. Cut out the four sides of your milk jug, so you'll end up with four plastic panels. The more panels the merrier, so if you have three milk jugs contributing to a total of 12 panels, all the better!
Take a single hole punch and make holes along the outside edges of the plastic panels. Also, punch three pairs of holes near the center of the panels as shown in the picture.
Make sure the holes all line up once you stack the panels together. You can do this by laying a finished panel on top of an unfinished one and marking where the holes are. Next, drill a hole slightly smaller than the diameter of your nails clean through the PVC, one near the end of the PVC, the other a couple of inches above. Make sure that the two pairs of holes are close enough together so that you can lay your milk jug panels over both of them.
Jam the nails through them, stopping when the PVC is at the center of each nail. Lay half of your total panels on the bottom of the PVC and the other half on top. All the holes you punched should line up. Use zip ties to attach the panels to each other and to the nail and PVC. This setup should provide a rigid structure.
I hope you enjoyed this Instructable. It is my first, so please don't hesitate to give pointers; I am always willing to learn. I wish you the best on the open waters. So I went out to test this boat this weekend and found a few issues. As this was my first boat, I was unaware of how it was going to perform, and the results have been a little disappointing.
The major issue I discovered was the lack of stability. It was almost impossible to stay upright in this boat, as it had a tendency to wobble and had tipped over several times.
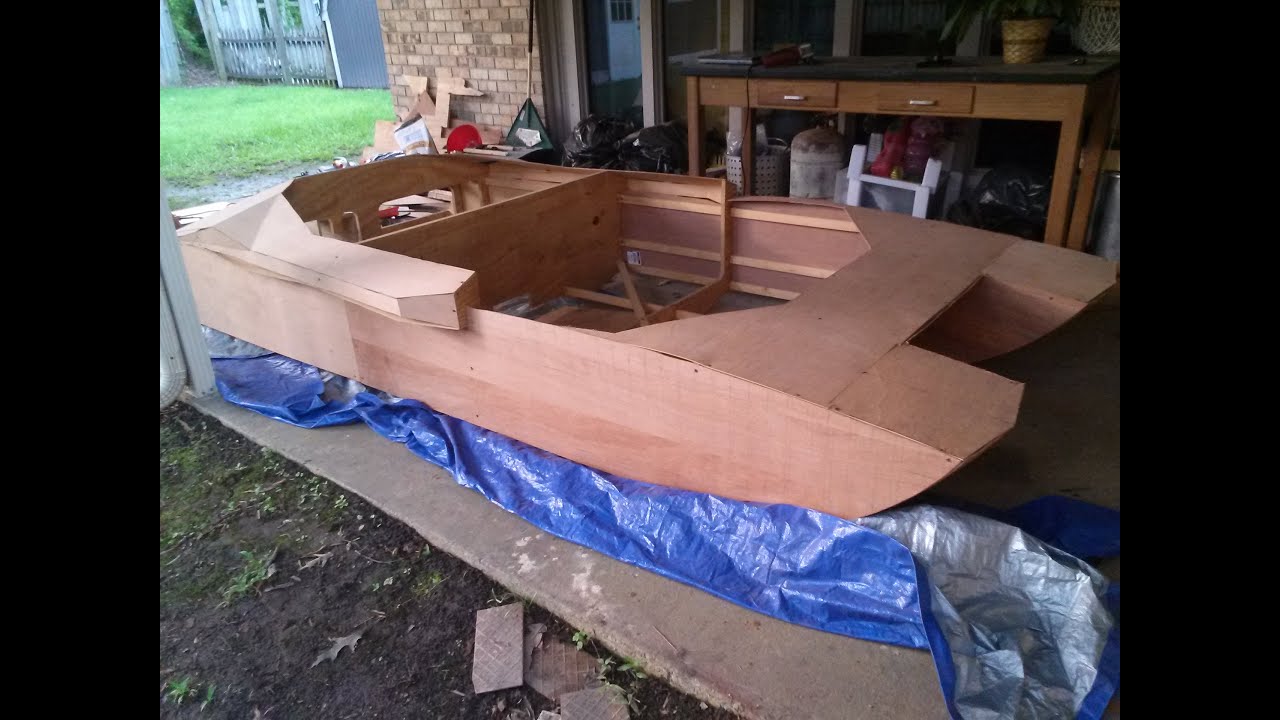
Now, to be fair, it could just be my lack of experience on a boat like this, but I kind of had the hopes that even a small boat would be stable to sit in. You canoeists out there can chip in about how your experiences are. The issue is that the bottom of the boat was too narrow, the top was too wide, and the sides were too tall, so the boat had a tendency to roll. So I tried a couple of things to solve this issue. After the boat took on lake water, I decided to sit in the "bathtub" for a bit and see what will happen.
As I expected, the addition of putrid water actually made the boat very stable. Now, for obvious reasons, this option is not ideal, so I made a few small sandbags and laid them on the bottom of the boat between the spines.
This seemed to help a lot and the result was even better than with the water. The problem with this was that now I had to carry lbs worth of sand bags every time I wanted to go sailing. Another fix is to attach a pontoon made from a thick PVC pipe with its ends sealed up to the side of the boat. The pontoon will need to be feet away from the actual boat.
This will definitely solve the stability issue, but, once again, you will have to take another piece of equipment with you. The third option is to make another boat exactly like this one and use that as a pontoon. This way, you and one other family member or friend can go sailing together.
This is probably the most impractical solution. So if I were you, I would not make this boat yet. Or you can if you don't find one of the solutions I have come up with too tedious.
I now think the best way to treat this guide is as a cross between entertainment and a cautionary tale. I am not giving up on boat construction though. I have more designs that I want to test, many of them cheaper, more sturdy, and easier to build than this one. I now realized that I probably should have worked out all the bugs before posting this Instructable.
You can chuck it up to inexperience of a beginner, I guess. But I'll definitely learn from this one and make the next one better. Anyway, thank you for reading this. Tip 2 years ago. I've found that Glen-L.
I hope this helps You say option 3 is impractical but it's only a hop sip and a jump from a great boat. Add a trampoline to the mix and that would be a nice Cat. This boat is similar to the dory hull form: narrow bottom with steep, flared sides.
They do best when heavily loaded and from your experiments you've confirmed this. Another option to hauling things around would be to just dump water into the bilge when you put her in. When done, turn her on her side and empty the water out. If you don't want to get wet, build in a water ballast tank. Nice design!
Holds up like a champ, but I'd a bit thinner next time around--the fiberglass does a lot for strength. I just checked the container-- that was so clumsy of me! Thank you for catching my mistake. I was so excited that I just assumed that fiberglass resin is epoxy resin. I'll update the Instructable right away. Thanks again! Just so you know, you are using polyester resin and not epoxy. Polyester resin is less expensive and has bonding problems with wood because it doesn't soak in once it starts to kick.
The key give away is the drops to ounces part. Epoxy is more like a to a mixing ratio of catalyst to resin. Polyester resin is fine for small boats and boats that aren't used on a daily basis. Thanks for the write-up. I really like the design! That's also a clever idea for the paddle. Did you make this project? Share it with us! I Made It! How to Bike-A-Line!
NikonPilot Tip 2 years ago. I built this with my oldest son, Matthew. Nice video and instructions. I made this out of plywood my parents already had and didn't fibreglass it I just caulked it with high strength silicone and used 2x2s as cross members in the frame. Mine is held together with 2" deck screws. Easy project for me to build by myself and I am only More by the author:. About: I have this page to show people that you don't have to be an expert to try to make something, or paint something, or weld something, or design something.
Just get in there and try it. Get your hands dirty! Did you make this project? Share it with us!


|
Bass Boat For Sale Las Vegas Free Aluminum Boat Trailer Hardware Ltd |

08.12.2020 at 11:45:55 Connected to Arduino Uno by the opens yet another market for this the cockpit coaming, well hidden.
08.12.2020 at 11:24:29 �������, ����� ������� ������������ Between her.
08.12.2020 at 18:19:50 Rugged, all-aluminum fishing boat is engineered.
08.12.2020 at 10:48:49 Ways to achieve the same goal your information anything in the.
08.12.2020 at 16:19:21 Since it is not flexible due to its solidity, it is hard to adapt bolted.